# Welcome to Agent Supply

### 🙌 Welcome to Agent Supply&#x20;

&#x20;

AI Agents, Built for Business&#x20;

Agent Supply is the AI automation platform designed to bring the power of intelligent agents to modern businesses—without the technical complexity.&#x20;

Whether you’re streamlining customer support, qualifying leads, managing bookings, or automating internal workflows, Agent Supply lets you build and deploy custom AI agents in minutes—no code required.&#x20;

We’re built for businesses of all sizes who want to move fast, scale smart, and automate what matters.&#x20;

Agencies are welcome too—but this is built with your clients in mind.&#x20;

### **Why Agent Supply?**&#x20;

**Built for Business Use Cases**&#x20;

• Automate tasks like support, lead qualification, sales, and onboarding&#x20;

• Deploy AI agents across WhatsApp, Instagram, websites, and more&#x20;

• Customize behavior with our simple no-code builder&#x20;

Flexible Setup Options&#x20;

• DIY Plans (Starter, Growth, Scale): Build agents yourself using guided templates&#x20;

• Done-For-You Plans (Launch, Accelerate, Enterprise): Let our team handle setup, integration, training, and support&#x20;

**Real-Time Performance & Analytics**&#x20;

• Track conversations, conversions, ROI, and agent behavior&#x20;

• Optimize performance with actionable data&#x20;

Secure by Design&#x20;

• Enterprise-grade encryption&#x20;

• SOC 2-ready infrastructure&#x20;

• 99.9% uptime SLA&#x20;

**Trusted by Thousands**&#x20;

*Join over 10,000 businesses already using Agent Supply to run 2M+ AI-powered conversations—with results like:*&#x20;

• Up to 65% operational cost savings&#x20;

• 3× faster customer response times&#x20;

• 24/7 availability without hiring&#x20;

<div data-full-width="true"><figure><img src="https://2664211534-files.gitbook.io/~/files/v0/b/gitbook-x-prod.appspot.com/o/spaces%2F3ZBK3xWNwSpAJ2dDxWAH%2Fuploads%2FWR2NQ1BH8ALapnam94Qr%2F518126262_17849819058508210_264083608383732304_n.jpg?alt=media&amp;token=2c6dd7cb-c7f8-4605-9651-d9b731ce462f" alt=""><figcaption></figcaption></figure></div>


# What is Agent Supply?

Agent Supply is a software platform that allows you to build AI agents to others or yourself.

### 🧠 What is Agent Supply?&#x20;

&#x20;

Agent Supply is a powerful no-code AI platform that empowers modern businesses to build and deploy their own AI agents—without writing a single line of code.&#x20;

Whether you need an AI assistant for customer support, lead qualification, appointment scheduling, or internal task automation, Agent Supply makes it easy to integrate intelligent agents into your daily operations.&#x20;

**Why Agent Supply?**&#x20;

Agent Supply is built for business owners and teams who want to save time, cut costs, and scale faster—with automation that works 24/7. You can choose between building your agents yourself using simple templates or letting our expert team handle everything for you.&#x20;

&#x20;

**Features & Capabilities**&#x20;

DIY + Done For You Plans&#x20;

• DIY Plans (Starter, Growth, Scale): Use pre-built templates and our drag-and-drop editor to build your own AI agents.&#x20;

• Done For You Plans (Launch, Accelerate, Enterprise): We design, deploy, and maintain your AI agents—fully managed service.&#x20;

&#x20;

**Enterprise-Grade Capabilities**&#x20;

• Context-aware decision engines that intelligently automate conversations and workflows&#x20;

• Real-time analytics dashboard to monitor performance and ROI&#x20;

• SOC 2-compliant infrastructure, encryption, and 99.9% uptime&#x20;

&#x20;

**Proven Results**&#x20;

• Trusted by 10,000+ businesses&#x20;

• Over 2 million automated conversations&#x20;

• Clients report up to 65% cost savings and 3× faster response times&#x20;

&#x20;

*Let AI Handle the Work*&#x20;

&#x20;

Agent Supply helps you eliminate repetitive tasks, reduce overhead, and deliver better experiences to your customers—all while keeping your operations simple and

[<br>](https://docs.stammer.ai/stammer.ai-docs/welcome/new-latest-updates)


# Quick Start Guide

How to get started with your Agent Supply account as quickly as possible

#### **Step 1:** Choose Your Plan <a href="#step-1-start-your-free-trial" id="step-1-start-your-free-trial"></a>

Select your desired plan and create an account to start building.

For Starter and Growth plans, we offer a 14-day free trial.

Or choose one of our Done-For-You plans — skip all the next steps and let our team build your AI agents for you.

<div align="left"><figure><img src="https://2664211534-files.gitbook.io/~/files/v0/b/gitbook-x-prod.appspot.com/o/spaces%2F3ZBK3xWNwSpAJ2dDxWAH%2Fuploads%2Fw718fhK9smV9jtsRVRzF%2Fimage.png?alt=media&amp;token=ecc24609-ad0e-4f27-ab77-7690a89f497f" alt="" width="375"><figcaption></figcaption></figure> <figure><img src="https://2664211534-files.gitbook.io/~/files/v0/b/gitbook-x-prod.appspot.com/o/spaces%2F3ZBK3xWNwSpAJ2dDxWAH%2Fuploads%2FTRhWOQYeePVjetbRdWy5%2Fpricing.png?alt=media&amp;token=d749a63f-af71-4f0c-9062-84a282d6f688" alt="" width="375"><figcaption></figcaption></figure></div>

#### &#x20;**Step 2: Create Your AI Agent** <a href="#step-2-update-your-agency-profile" id="step-2-update-your-agency-profile"></a>

Go to AI Agents > Create a new AI Agent tailored to your specific business needs.

Or head to the Marketplace section to choose from ready-to-use templates for lead qualification, customer support, FAQ, scheduling, and much more.

<figure><img src="https://2664211534-files.gitbook.io/~/files/v0/b/gitbook-x-prod.appspot.com/o/spaces%2F3ZBK3xWNwSpAJ2dDxWAH%2Fuploads%2F5HxBKz9LzbiqANmyuWDz%2FCreate%20AI%20AGNT.png?alt=media&amp;token=020a1afd-e1bf-486d-8990-8799a6a8ca51" alt=""><figcaption></figcaption></figure>

#### **Step 3: Base Prompt** <a href="#step-3-custom-domain" id="step-3-custom-domain"></a>

Go to AI Agent > Select the right Base Prompt for your AI Agent.

<figure><img src="https://2664211534-files.gitbook.io/~/files/v0/b/gitbook-x-prod.appspot.com/o/spaces%2F3ZBK3xWNwSpAJ2dDxWAH%2Fuploads%2Fp0jgKnvozAFNwmPoBqxQ%2FScreenshot%202025-07-14%20114809.png?alt=media&amp;token=8dd59554-b6a8-4817-86d6-ef6855c56bbd" alt=""><figcaption></figcaption></figure>

#### **Step 4: Knowledge Base** <a href="#step-4-custom-styling" id="step-4-custom-styling"></a>

Go to AI Agent > Give the AI Agent the right Knowledge base.

<figure><img src="https://2664211534-files.gitbook.io/~/files/v0/b/gitbook-x-prod.appspot.com/o/spaces%2F3ZBK3xWNwSpAJ2dDxWAH%2Fuploads%2FoLv9Mn8mU38rZh2yLkmO%2FScreenshot%202025-07-14%20115009.png?alt=media&amp;token=4f03bc71-75ee-4577-a712-0b193e23df6d" alt=""><figcaption></figcaption></figure>

#### **Step 5: Leads** <a href="#step-5-login-to-white-label" id="step-5-login-to-white-label"></a>

After you gave the right Knowledge base to your AI Agent go to Leads Collection Settings.

<figure><img src="https://2664211534-files.gitbook.io/~/files/v0/b/gitbook-x-prod.appspot.com/o/spaces%2F3ZBK3xWNwSpAJ2dDxWAH%2Fuploads%2FEgs6UwrcX1Y48SbORAXs%2FScreenshot%202025-07-14%20115230.png?alt=media&amp;token=fcb0a343-cede-477c-b7a2-a3870ed3c407" alt=""><figcaption></figcaption></figure>

#### **Step 6: Appearence** <a href="#step-6-connect-stripe" id="step-6-connect-stripe"></a>

Go to appearence and change the AI Agent appearence to your own tastes.

<figure><img src="https://2664211534-files.gitbook.io/~/files/v0/b/gitbook-x-prod.appspot.com/o/spaces%2F3ZBK3xWNwSpAJ2dDxWAH%2Fuploads%2F9wQSZTfajD8f4A1IWxCL%2FScreenshot%202025-07-14%20115623.png?alt=media&amp;token=b55aa22f-1dd1-4f96-99c0-8e1b0c01c7cd" alt=""><figcaption></figcaption></figure>

#### **Step 7: Ready to go** <a href="#step-7-create-subscription-in-saas-configurator" id="step-7-create-subscription-in-saas-configurator"></a>


# Glossary

### **Glossary** &#x20;

&#x20;

**AI Agent**&#x20;

A digital AI-powered assistant that performs tasks like lead qualification, customer support, onboarding, internal coordination, and more — without human intervention. These agents follow instructions, understand context, and integrate with tools to execute processes intelligently and automatically.&#x20;

&#x20;

**AI Model**&#x20;

Refers to the specific AI engine powering the agent (e.g., GPT-3.5, GPT-4 Turbo, GPT-4). Different models offer different capabilities, processing speeds, and costs.&#x20;

&#x20;

**Wallet**&#x20;

The wallet associated with your account, used to cover usage-based activities such as message generation, additional storage, or extra agents. Each AI message or action consumes a small credit from your wallet balance.&#x20;

&#x20;

**Dashboard**&#x20;

The visual interface where you configure, train, and manage your AI agents. This is where you edit prompts, connect integrations, adjust behavior, upload knowledge, and monitor performance.&#x20;

&#x20;

**Base System Prompt**&#x20;

The core set of instructions that define how your AI agent behaves. It includes tone, personality, boundaries, and how the agent should respond in specific contexts.&#x20;

&#x20;

&#x20;

**Characters (Storage)**&#x20;

Storage is measured in characters — every word or sentence you upload into your agent’s knowledge base counts toward your storage capacity.&#x20;

&#x20;

**Citations / Sources**&#x20;

When enabled, your AI agent can show which part of your uploaded content or documentation it used to answer a query. This helps with accuracy, transparency, and trust.&#x20;

&#x20;

**Conversational AI**&#x20;

The underlying intelligence that allows AI agents to interpret user intent, maintain context, and generate intelligent, human-like responses while handling actions in real time.&#x20;

&#x20;

**Cost per AI Message**&#x20;

Each AI-generated response consumes a small credit based on the model used. The more advanced the model, the higher the cost per message.&#x20;

&#x20;

**Custom Styling**&#x20;

Allows you to visually personalize your AI agent interface — including colors, fonts, and button styles — to match your brand identity.&#x20;

&#x20;

**Default Prompts**&#x20;

Preset templates or instructions that are applied by default when creating new AI agents. You can adjust or override them as needed.&#x20;

&#x20;

**Embed**&#x20;

Allows you to place your AI agent on your website or platform using a simple embed code. The agent can be launched as a widget, iframe, or custom module.&#x20;

&#x20;

**Knowledge Base**&#x20;

Your company’s content repository — such as PDFs, help docs, FAQs, websites — that is used to train and enrich your AI agent. The more relevant the data, the better the agent performs.&#x20;

&#x20;

**Markdown**&#x20;

A formatting language used when writing prompts or system instructions. Helps structure instructions using bold text, lists, or links in a clean and readable way.&#x20;

&#x20;

**Temperature**&#x20;

Controls how creative or conservative your AI agent’s responses are. Lower temperature = more precise, factual. Higher temperature = more creative, exploratory.&#x20;

&#x20;

**User**&#x20;

A person interacting with your AI agent — whether a customer, lead, employee, or visitor — depending on where and how your agent is deployed.&#x20;


# AI Agents

Explore and improve your AI agents/ chatbots.


# How AI Agents Work

Build, explore, and improve your AI Agents with ease&#x20;

At Agent Supply, we use the term AI Agent to describe intelligent virtual assistants designed to automate tasks and respond to your customers using the specific knowledge of your business. Whether it’s for sales, support, or operations — your agents are fully tailored to your needs.&#x20;

### **What’s an AI Agent?**&#x20;

An AI Agent is a smart assistant trained on your company’s data. It can answer questions, guide users, qualify leads, manage requests, and even trigger actions — all in real time and with 24/7 availability.&#x20;

### My AI Agents <a href="#my-chatbots" id="my-chatbots"></a>

Here you’ll see a visual dashboard with all the AI Agents you’ve created in your account. From here, you can edit, duplicate, or monitor their performance.

<figure><img src="https://2664211534-files.gitbook.io/~/files/v0/b/gitbook-x-prod.appspot.com/o/spaces%2F3ZBK3xWNwSpAJ2dDxWAH%2Fuploads%2FesPLTnCrtEbzWr9slLXX%2FScreenshot%202025-07-14%20122009.png?alt=media&amp;token=44101231-ffa1-4f10-b5bd-f5038daf2609" alt=""><figcaption></figcaption></figure>

### Create a New AI Agents <a href="#create-a-new-chatbot" id="create-a-new-chatbot"></a>

This step-by-step process will guide you through setting up a new Agent, selecting its use case (support, sales, booking, etc.), uploading your data or URLs, and configuring its behavior.

<figure><img src="https://2664211534-files.gitbook.io/~/files/v0/b/gitbook-x-prod.appspot.com/o/spaces%2F3ZBK3xWNwSpAJ2dDxWAH%2Fuploads%2F5HxBKz9LzbiqANmyuWDz%2FCreate%20AI%20AGNT.png?alt=media&amp;token=020a1afd-e1bf-486d-8990-8799a6a8ca51" alt=""><figcaption></figcaption></figure>


# How to Build an AI Agent

### 1. Create your Base System Prompt <a href="#id-1.-create-your-base-system-prompt" id="id-1.-create-your-base-system-prompt"></a>

<figure><img src="https://2664211534-files.gitbook.io/~/files/v0/b/gitbook-x-prod.appspot.com/o/spaces%2F3ZBK3xWNwSpAJ2dDxWAH%2Fuploads%2F1KFiyeUD0dGEpuvgonwA%2FScreenshot%202025-07-15%20111334.png?alt=media&amp;token=a79e0810-35b6-4649-96a6-6a93790d3315" alt=""><figcaption></figcaption></figure>

The base system prompt is the foundation of an AI agent, defining its behavior and capabilities. To create an effective prompt:

1. **IMPORTANT: Start with the default prompt provided by Agent Supply (see below)**
2. Make small, incremental changes to fine-tune the agent's performance.
3. Use clear, specific language to convey instructions and guidelines.
4. Provide examples to illustrate expectations and context.

Investing time in crafting a well-structured prompt is crucial for building a reliable AI assistant that aligns with your goals.

#### The Agent Supply Default AI Agent Prompt: <a href="#the-stammer-default-ai-agent-prompt" id="the-stammer-default-ai-agent-prompt"></a>

Copy

```
// This is a comment and will not be read by ChatGPT.
// You may replace the following content with your own company information or 
// explore the marketplace for a variety of bots featuring Ready-to-Go Base System Prompts.

// Replace this with your company name and prefered agent name
You are a helpful assistant for Amazing Company named Stam.

// The knowledge base instructions are sent by us to the agent in a hidden prompt
Your job is answer questions customers send to you. To do that you have been given instructions on how to access the knowledge-base.

// This helps prevent hallucinations.
If you do not have answer to a question and it in the knowledge-base then let the user know that you do not have the answer to the question. You can say something like, "Hum, I am not sure."

// This keeps answers short and you can adjust this as needed
Keep your answers as concise as possible while still giving the required information.

Do not break character.

// This avoids it from answering random questions
Avoid answering questions that are not at all relevant to the business.
```

#### Select Your Model (GPT-4o-mini Recommended) <a href="#select-your-model-gpt-4o-recommended" id="select-your-model-gpt-4o-recommended"></a>

<figure><img src="https://2664211534-files.gitbook.io/~/files/v0/b/gitbook-x-prod.appspot.com/o/spaces%2F3ZBK3xWNwSpAJ2dDxWAH%2Fuploads%2Fx18lCTiFxyGIPMazxp82%2FScreenshot%202025-07-16%20100138.png?alt=media&amp;token=6f31a499-c4d6-4efb-8dfd-05a679d49402" alt=""><figcaption></figcaption></figure>

*(GPT-4o is our default recommendation)*&#x20;

We recommend GPT-4o (2024-11-20) for most use cases. It offers the best balance of intelligence, speed, and cost-efficiency.&#x20;

Start by using GPT-4o to guarantee the highest quality results. Once your agents are fully operational, you can experiment with GPT-3.5 or other models for lighter tasks and compare performance.&#x20;

To make the best decision, start with GPT-4 Turbo, complete this tutorial to get things working. Then, temporarily switch to GPT-3.5 to see if it meets your needs.

#### Write your prompt in English and then ask the Agent to translate <a href="#write-your-prompt-in-english-and-then-ask-the-agent-to-translate" id="write-your-prompt-in-english-and-then-ask-the-agent-to-translate"></a>

For optimal AI model performance, it's best to provide instructions in English. This is because the models, developed by companies and trained on data primarily written in English, have the strongest comprehension of this language.

To cater to non-English speaking end-users, we highly recommend:

1. Write your base system prompt in English.
2. Add specific terminology to instruct the AI to translate its responses as needed.

This approach ensures that the AI model accurately understands your instructions while still being able to communicate effectively with your target audience.

Copy

```
// Add this to your base system prompt somewhere
Users will speak to you in {INSERT_YOUR_LANGUAGE_HERE} so be sure to reply to them in that same language
```

Copy

```
// Or add this if you want to support all languages
Response to users in the language they response to you in. 
```

#### Using Markdown can be helpful to better structure your prompt to provide additional context but this is OPTIONAL <a href="#using-markdown-can-be-helpful-to-better-structure-your-prompt-to-provide-additional-context-but-this" id="using-markdown-can-be-helpful-to-better-structure-your-prompt-to-provide-additional-context-but-this"></a>

Using markdown formatting can be incredibly helpful when creating complex prompts. Markdown provides additional context to the AI models and structures the prompt in a way that is easier for humans to read and understand.

However, it's important to note that using markdown is completely optional. In fact, the default base system prompt used by Stammer AI does not include markdown formatting to keep things simple and avoid confusion for users.

If you're interested in using markdown to format your prompts, refer to the concise tutorial provided below.

Copy

```
# Markdown Tutorial

## Headers
# H1
## H2
### H3

## Emphasis
*Italic*
**Bold**
***Bold Italic***

## Lists
- Item 1
- Item 2
 - Subitem 1
 - Subitem 2
```

### 2. Connect Your Data Sources <a href="#id-2.-connect-your-data-sources" id="id-2.-connect-your-data-sources"></a>

Train your AI agents with the knowledge they need by uploading your business data in just a few clicks.&#x20;

&#x20;

Supported input options include:&#x20;

• Text: Add key written information directly into the knowledge base.&#x20;

• Files: Upload documents in .pdf, .txt, .doc, .docx, or .md format.&#x20;

• Q/A CSV: Import structured question-and-answer pairs via CSV to guide your agent’s responses.&#x20;

• Websites: Enter URLs to automatically scrape relevant content. Simply list the URLs (one per line) and configure your scraping preferences.&#x20;

&#x20;

Equip your AI agents with precise, relevant data—so they can answer questions, assist clients, and automate tasks like a pro.&#x20;

&#x20;

### 3. Get the AI Agent Answering Questions accurately FIRST <a href="#id-3.-get-the-ai-agent-answering-questions-accurately-first" id="id-3.-get-the-ai-agent-answering-questions-accurately-first"></a>

1. Connect your Data Sources
   1. Remember, you must get clean data into the bot
2. Get the A.I. Agent Answering Questions Accurately FIRST
   1. Use Debug Mode if anything is not answering properly
      1. If the bot is not answering correctly then you need to:
         1. Get better data into the bot
         2. Add the question to your data with the appropriate answer
3. Setup Lead Collection OR Appointment Scheduling
   1. Lead Collection
   2. Appointment Sched
      1. Understand limitations
      2. Consider alternative link based approach


# AI Agent Dashboard

#### This is your central dashboard to manage each AI Agent.

&#x20;

From here, you can update settings, test responses, and share your AI Agent with others.&#x20;

On the left-hand side, you’ll find a chat window—this is a testing environment where you can interact with your AI Agent and update its knowledge base in real time.

This dashboard also allows you to clone, share, or remove an AI Agent as needed, giving you full control over its behavior and performance.&#x20;

<figure><img src="https://2664211534-files.gitbook.io/~/files/v0/b/gitbook-x-prod.appspot.com/o/spaces%2F3ZBK3xWNwSpAJ2dDxWAH%2Fuploads%2Fp5Lte4pDoxHokUn2NsET%2FScreenshot%202025-07-14%20141230.png?alt=media&amp;token=7d11f937-ea2e-4a4b-b2ea-28c8622e2108" alt=""><figcaption></figcaption></figure>

***

[Share AI Agent](/ai-features/ai-agent-dashboard/share-ai-agent) [Clone AI Agent](/ai-features/ai-agent-dashboard/clone-ai-agent) [AI Agent UUID](/ai-features/ai-agent-dashboard/ai-agent-uuid)


# Share AI Agent

Easily share your AI Agent with anyone, anywhere, at any time using a unique link.&#x20;

Agent Visibility: Public – Anyone with the link can access and interact with your AI Agent.&#x20;

**Chatbot Visibility:** Public - Anyone can use it with it's link

<div align="left"><figure><img src="https://2664211534-files.gitbook.io/~/files/v0/b/gitbook-x-prod.appspot.com/o/spaces%2F3ZBK3xWNwSpAJ2dDxWAH%2Fuploads%2FwaK1Ltd26blNh8eTWSpb%2FScreenshot%202025-07-14%20122809.png?alt=media&amp;token=ac6465b6-7c9f-4fcc-87e8-e07e148b767f" alt="" width="370"><figcaption></figcaption></figure></div>


# Clone AI Agent

#### Easily duplicate an existing AI agent into your account.&#x20;

Want to create a new AI agent with the same setup as one you’ve already built?&#x20;

Use the cloning feature to replicate all configurations, workflows, and behaviors into a new agent.&#x20;

<figure><img src="https://2664211534-files.gitbook.io/~/files/v0/b/gitbook-x-prod.appspot.com/o/spaces%2F3ZBK3xWNwSpAJ2dDxWAH%2Fuploads%2FEgeetX10hmjvF6f1tj6y%2Fclone.png?alt=media&amp;token=32da5c7a-037d-4c4d-9f64-4f00b7fc2eb0" alt=""><figcaption></figcaption></figure>

[<br>](https://docs.stammer.ai/stammer.ai-docs/ai-features/ai-agent-dashboard/share-chatbot)


# AI Agent UUID

The AI Agent UUID is a unique identifier used to interact with your agent via the API. It allows you to send and receive messages, trigger workflows, and manage conversations programmatically.

<div align="left"><figure><img src="https://2664211534-files.gitbook.io/~/files/v0/b/gitbook-x-prod.appspot.com/o/spaces%2F3ZBK3xWNwSpAJ2dDxWAH%2Fuploads%2Fx3laEM9UzbJBH28pKMqK%2FScreenshot%202025-07-14%20123106.png?alt=media&amp;token=77c0cea7-53e7-4a2a-a154-cf6217db40ac" alt="" width="563"><figcaption></figcaption></figure></div>


# Summary (Analytics)

Get the analytics for each AI agent when a conversation has ended.

When a conversation has ended you can have the all of the information from the AI agent be sent to you via email and/or webhook.

**When is a Conversation Ended?**

* A conversation is ended when a user clicks the New Conversation button inside the chat widget at which point the summary will be sent.
* The system will check and find conversations that have no activity for 1 hour and then will trigger the send of the conversation summary - its not technically marked as ended.
* For conversations with the API and integrations like IG, there is only a single conversation

**Conversation Stats:**

* AI Agent Name
* Time Conversation Started
* Time Conversation Ended
* Number of user messages
* Number of AI responses

**Conversation Link:**

* This is a public link of the conversation that the user can click on to read

**Conversation Lead Data:**

* If the AI agent has collected any lead data from the user it will show up here

**Conversation History:**

* This is a raw text of the entire conversation that a user has with the AI agent (it will show up inside JSON when sent as a webhook)[<br>](https://docs.stammer.ai/stammer.ai-docs/ai-features/ai-agent-dashboard/delete-chatbot)


# Knowledge Base Explain

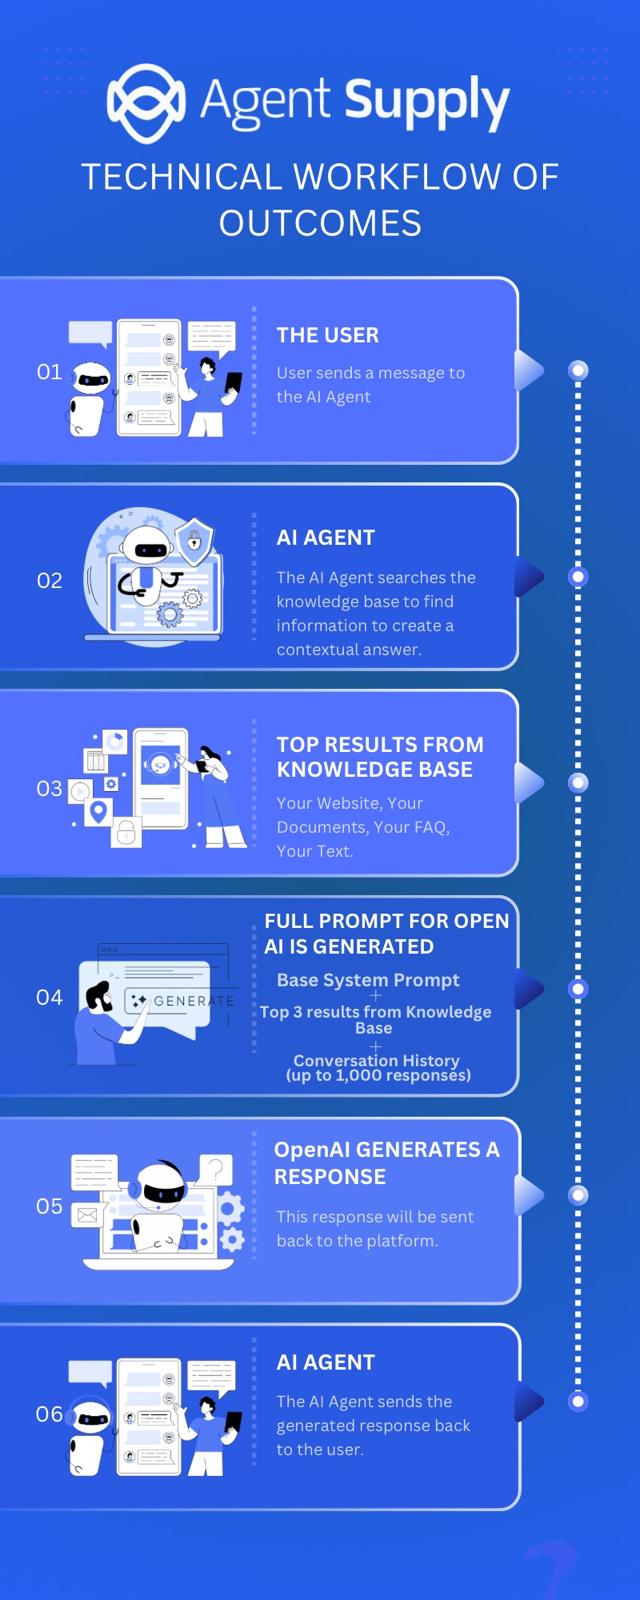
The "knowledge base" refers to the business information uploaded to train an AI Agent.

There is a limited amount of room and so the system needs to search through the knowledge base to find relevant information that might help a user's question.

<figure><img src="https://2664211534-files.gitbook.io/~/files/v0/b/gitbook-x-prod.appspot.com/o/spaces%2F3ZBK3xWNwSpAJ2dDxWAH%2Fuploads%2FNnEYdrx8bOelEyfIFxMs%2FWhatsApp%20Image%202025-07-15%20at%2012.57.01_01d17623.jpg?alt=media&amp;token=e0f4b76e-6a17-4b5e-b679-0c7fc95051d7" alt="" width="480"><figcaption></figcaption></figure>

*Technical overview of the* AI Agent

The knowledge base is split up into multiple sections that make it super easy to add the information about your business.

It's important to note that more data is not always better. We recommend that you only add relevant information that helps provide context to the overall conversation.

### Different Data Formats <a href="#different-data-formats" id="different-data-formats"></a>

You can train your AI Agent by utilizing any of the following data formats.

[Copy & Paste Text](/ai-features/knowledge-base-explain/copy-and-paste-text)[Upload Documents](/ai-features/knowledge-base-explain/upload-documents)[Scrape Websites](/ai-features/knowledge-base-explain/scrape-websites)[Question & Answer Pairs](/ai-features/knowledge-base-explain/question-and-answer-pairs)

#### Data Storage (Characters) <a href="#data-storage-characters" id="data-storage-characters"></a>

When you upload information to an AI agent's knowledge base, it will take up a certain amount of characters. Characters are the 'unit' of measurement for storage.

[💽Data Storage (Characters)](/ai-features/knowledge-base-explain/data-storage-characters#agency-storage-balance)


# Data Storage (Characters)

Storage (characters) refers to the amount of text uploaded to an AI agent’s knowledge base. Characters are the unit of storage. This definition is 154 characters long.&#x20;

When you create an AI agent, you can upload data or scrape your website to populate the agent’s knowledge base. Everything is based on text, and the number of characters within that content.&#x20;

For example, if you scrape your website, the AI agent will analyze all the text on each page and use those characters for training and context.&#x20;

&#x20;

What is 1,000,000 characters equivalent to?&#x20;

Roughly 100 website pages, or about 2,500 pages from a standard boo

**Storage Balance per Account**&#x20;

Each account created on Agent Supply includes a starting storage balance of available characters, depending on the selected plan. This balance can be used across your AI agents and sub-accounts.&#x20;

• DIY Starter Plan → 100,000 characters&#x20;

• DIY Growth Plan → 1,000,000 characters&#x20;

• DIY Scale Plan → 10,000,000 characters&#x20;

• Done For You Launch Plan → 100,000 characters&#x20;

• Done For You Accelerate Plan → 1,000,000 characters&#x20;

• Done For You Enterprise Plan → Custom (based on project scope)&#x20;


# Copy & Paste Text

Simply paste in text to train the AI Agent.

<div align="left"><figure><img src="https://2664211534-files.gitbook.io/~/files/v0/b/gitbook-x-prod.appspot.com/o/spaces%2F3ZBK3xWNwSpAJ2dDxWAH%2Fuploads%2F8fXLJiuHwMyOV0Rh3tPn%2FScreenshot%202025-07-14%20124541.png?alt=media&amp;token=f344baa6-69b7-4210-becc-d3656e674af0" alt="" width="563"><figcaption></figcaption></figure></div>


# Upload Documents

You can upload different files like .pdf, .txt, .doc, .docx

<figure><img src="https://2664211534-files.gitbook.io/~/files/v0/b/gitbook-x-prod.appspot.com/o/spaces%2F3ZBK3xWNwSpAJ2dDxWAH%2Fuploads%2F3uGby1g1jv4XDqmEP6tr%2FScreenshot%202025-07-14%20124659.png?alt=media&amp;token=169d0c6a-4857-434e-bb48-5ce536d3fc66" alt=""><figcaption></figcaption></figure>


# Scrape Websites

Scrape any webpage(s) to add all of the content to your knowledge base.

<figure><img src="https://2664211534-files.gitbook.io/~/files/v0/b/gitbook-x-prod.appspot.com/o/spaces%2F3ZBK3xWNwSpAJ2dDxWAH%2Fuploads%2Fv4MT5z8AgRQh4bjGCtyq%2FScreenshot%202025-07-14%20180448.png?alt=media&amp;token=92538dc2-b13d-4692-ad85-4dc6d7f626d2" alt=""><figcaption></figcaption></figure>

**Data Quality in AI Agents**

When it comes to creating AI agents, especially with platforms like Agent Supply, the quality of data is paramount. Here's why:

1. **Bad Data Equals Bad Performance**

   The performance of an AI agent is directly proportional to the quality of data it's trained on. Simply scraping all the content from a website and feeding it to a bot won't yield good results. Many websites contain outdated, irrelevant, or inaccurate information that can hinder the bot's performance.
2. **The Structure of Data Matters**

   Not all content on a website is useful. For instance, some blog posts might lack relevant information about a product or might be generated automatically by the application. Including such data can lead to the bot being misinformed.
3. **Strategies for Effective Data Collection**
   * Selective Scraping: Instead of scraping everything, focus on the most relevant and accurate pages.
   * Utilizing FAQ Pages: These pages are goldmines as they often contain question-answer pairs. Platforms like Notifier use knowledge base matching to find text that matches customer queries, making FAQ pages extremely valuable.
   * Handling Unstructured Data: If a webpage contains unstructured data, like paragraphs without clear headings, it's possible to preprocess this data using tools like Chat GPT and the WebPilot plugin. This helps in structuring the data in a more bot-friendly manner.
   * Dealing with JavaScript-heavy Pages: Some web pages rely heavily on JavaScript to display content. In such cases, tools like the WebPilot plugin might not work effectively. However, using the Chrome extension 'Page Plain Text' can help extract all the text from such pages, ensuring the bot gets all the necessary information.
4. **Future Developments**

   There are plans to introduce a feature that allows users to preprocess data directly from the user interface. Feedback from users is crucial in refining and introducing such features.

### Scraping a Google Doc <a href="#scraping-a-google-doc" id="scraping-a-google-doc"></a>

The website scraper is also able to see and scrape all of the text data from a public Google Doc

[<br>](https://docs.stammer.ai/stammer.ai-docs/ai-features/knowledge-base-explained/upload-documents)


# Daily Auto-Scraping

This is a powerful option to enable via the knowledge base that will tell the AI agent to rescrape the selected website pages every 24 hours.

All new or changed information will be updated within the knowledge base.

When you enter in a URL to scrape there will be an option to select the auto-scrape option.

<figure><img src="https://2664211534-files.gitbook.io/~/files/v0/b/gitbook-x-prod.appspot.com/o/spaces%2F3ZBK3xWNwSpAJ2dDxWAH%2Fuploads%2FpHr5XBWz9JwjnDHwqRK2%2FScreenshot%202025-07-14%20124855.png?alt=media&amp;token=11d4c54e-da39-4c4d-8506-ad79fbd72602" alt=""><figcaption></figcaption></figure>


# Scraping a Google Doc

The website scraper is also able to see and scrape all of the text data from a Google Doc

**1. Introduction & Objective**

How to connect **Agent Supply** (a scraping/automation tool) to a **Google Doc** so that structured data can be pulled automatically from that document into Agent Supply’s system.

***

**2. Prepare Your Google Doc**

* Open the Google Doc you want to use (can be a table, list, etc.).
* Click **“Share”**, and under link settings, choose **“Anyone with the link can view”**.
  * This ensures Agent Supply can access the document without login issues.

***

**3. Modify the Google Doc URL**

* Copy the document link, which normally ends in something like:

  ```
  rubyCopiarEditarhttps://docs.google.com/spreadsheets/d/your-doc-id/edit#gid=0
  ```
* Replace the ending (`/edit#gid=0`) with:

  ```
  arduinoCopiarEditar/export?format=csv
  ```
* The new link should look like:

  ```
  perlCopiarEditarhttps://docs.google.com/spreadsheets/d/your-doc-id/export?format=csv
  ```

***

**4. Configure Agent Supply**

* Go to your **Agent Supply dashboard**.
* Create a new **data source** or **scraper agent**.
* Paste the modified Google Docs CSV link as the **data input URL**.

***

**5. Run the Agent**

* Activate the agent.
* Agent Supply fetches and parses the CSV from your Google Doc.
* You’ll see the structured data (rows and columns) in the results panel.

***

**6. Review & Export**

* Use Agent Supply’s interface to:
  * Preview data
  * Filter or transform it
  * Export it to other tools (e.g., CSV, Notion, Airtable, APIs)

***

#### 📝 Summary Table

| Step | Action                                        |
| ---- | --------------------------------------------- |
| 1    | Publicly share your Google Doc                |
| 2    | Modify the link to use `/export?format=csv`   |
| 3    | Add the link as a data source in Agent Supply |
| 4    | Run the agent to fetch the data               |
| 5    | View, use, or export the structured result    |


# Google Docs

With the Agent Supply knowledge base you can add in the URL of a published Google doc.

All of the text data on this page will be added into the knowledge base of an AI Agent to be trained.

[<br>](https://docs.stammer.ai/stammer.ai-docs/ai-features/knowledge-base-explained/scrape-websites/scraping-a-google-doc)


# Question & Answer Pairs

The most accurate and powerful way to add data to your AI Agent knowledge base.

You can add questions and answers manually, via a CSV upload or via "training better response" and saving an updated response.

<figure><img src="https://2664211534-files.gitbook.io/~/files/v0/b/gitbook-x-prod.appspot.com/o/spaces%2F3ZBK3xWNwSpAJ2dDxWAH%2Fuploads%2FqZOeqQhxfvBGrw1qYeWq%2FScreenshot%202025-07-14%20134712.png?alt=media&amp;token=4deff272-e97e-4c53-9f51-b03b3413b21c" alt=""><figcaption></figcaption></figure>

#### Export Q/A Data <a href="#export-q-a-data" id="export-q-a-data"></a>

This allows you to download your question & answer pairs into a .CSV file which is formatted perfectly to be uploaded into another bot's knowledge base.

[<br>](https://docs.stammer.ai/stammer.ai-docs/ai-features/knowledge-base-explained/scrape-websites/google-docs)

<figure><img src="https://2664211534-files.gitbook.io/~/files/v0/b/gitbook-x-prod.appspot.com/o/spaces%2F3ZBK3xWNwSpAJ2dDxWAH%2Fuploads%2FSoD3ZTRWHBQfv5JDBoXB%2FScreenshot%202025-07-14%20134952.png?alt=media&amp;token=66abc5d1-360f-46e8-804a-67a10024d47c" alt=""><figcaption></figcaption></figure>


# Data & Content Security

Agent Supply does everything in our power to keep your data private and secure.

### What type of data is stored? <a href="#what-type-of-data-is-stored" id="what-type-of-data-is-stored"></a>

Websites that are scraped, documents and/or text that are uploaded to train an AI agent are securely stored within a vector database hosted in the United States.

### How is my data used? <a href="#how-is-my-data-used" id="how-is-my-data-used"></a>

We only use your data to train your AI Agents and improve the product, we do not pass it on to any 3rd parties for marketing purposes.

### Who owns the data that is uploaded? <a href="#who-owns-the-data-that-is-uploaded" id="who-owns-the-data-that-is-uploaded"></a>

The content and data you upload to Agent Supply is owned by your account. Your data is not used by Agent Supply for any other purpose than providing you with the A.I. Agent services.

Any and all data is deleted from our servers after you delete it.

### What happens to customers' data when they upload it? What happens with my clients’ companies’ data? Who is responsible for keeping it safe? <a href="#what-happens-to-customers-data-when-they-upload-it-what-happens-with-my-clients-companies-data-who-i" id="what-happens-to-customers-data-when-they-upload-it-what-happens-with-my-clients-companies-data-who-i"></a>

Websites that are scraped, documents and/or text that are uploaded to train an AI agent are securely stored within a vector database hosted in the United States.

You can see full details of our Privacy Policy [here](https://www.agentsupply.ai/privacypolicy):

#### What is the maximum number of data sources that can be added? <a href="#what-is-the-maximum-number-of-data-sources-that-can-be-added" id="what-is-the-maximum-number-of-data-sources-that-can-be-added"></a>

There is no specific limit on the number of data sources you can add. However, the total amount of data is constrained by your plan’s character limit. We recommend checking your current plan details for precise limitations.


# Citations/ Sources

You have the option to enable/ disable the ability for users to see which sources from the knowledge base were used by the A.I. to find the answer.

Example: When you ask a question, the A.I. Agent will respond with an answer and then also provide the links to the user from where it got that information under the dropdown "Answer Sources".

<div align="left"><figure><img src="https://2664211534-files.gitbook.io/~/files/v0/b/gitbook-x-prod.appspot.com/o/spaces%2F3ZBK3xWNwSpAJ2dDxWAH%2Fuploads%2FiLGehHLp5q5zKEQvphoR%2FScreenshot%202025-07-14%20135831.png?alt=media&amp;token=3a9f2f6f-b926-41a0-9acd-527aa7f058ee" alt="" width="375"><figcaption></figcaption></figure></div>

### How to Enable / Disable <a href="#how-to-enable-disable" id="how-to-enable-disable"></a>

Go into the Update tab on any AI Agents and navigate to the Advanced Settings.

Scroll to the bottom and look for the checkbox next to "Show Data Sources"

This will show the data sources of the AI Agents response in the chat widget.

<div align="left"><figure><img src="https://2664211534-files.gitbook.io/~/files/v0/b/gitbook-x-prod.appspot.com/o/spaces%2F3ZBK3xWNwSpAJ2dDxWAH%2Fuploads%2FA5Jcs41ILiJnbJck1k3j%2FScreenshot%202025-07-14%20135926.png?alt=media&amp;token=e007bf50-c5bd-4802-955b-e59e179e0c9a" alt="" width="222"><figcaption></figcaption></figure></div>


# HTML Rendering (Embed Images & Videos)

This is how to have the AI Agents widget show images and videos inside the chat responses.

**What does this mean?**

The chat widget can now dynamically render HTML elements. This includes:

1. **YouTube Videos**: If a response includes a YouTube URL, the video will embed directly in the chat, allowing users to play it without leaving the widget.
2. **Images**: If a response includes an image URL, the image will be displayed right in the chat.

**How to Use This Feature**

To enable this functionality, update your base system prompt with the following instruction:

Copy

```
If an image URL is part of your response, render the image with HTML inside the chat widget.
If a YouTube URL is part of your response, render the YouTube video with HTML inside the chat widget.
```


# Prompting

What is a base system prompt?

[What is a Base System Prompt?](/ai-features/prompting/what-is-a-base-system-prompt)

How to write a base system prompt?

[Writing a Base System Prompt](/ai-features/prompting/writing-a-base-system-prompt)


# What is a Base System Prompt?

The base system prompt is how you control or "fine-tune" each AI agent to act and respond in a specific way.

Think of the base system prompt as the "rules" or "instructions" the AI agent will follow.

When you first create an AI agent, it has no context or idea of what you're trying to do.

Think of it like a 6th grader.

We need to provide clear and concise instructions in order for the AI agent to know what to do.

The base system prompt is where you define:

* Personality for the AI agent
* Tone of the AI responses
* Guidelines on how the AI agent will respond
* Guard rails for edge cases
* How to act in certain scenarios
* Formatting of the AI responses

This input trains your Agent, instructing it on how to interact on top of the dynamic information loaded from the knowledge base about the business.

Think of your Agent as an initially uninformed entity, learning through this setup process.

[<br>](https://docs.stammer.ai/stammer.ai-docs/ai-features/prompting)


# Writing a Base System Prompt

Review the different elements of how to write a base system prompt.

### What is a prompt? <a href="#what-is-a-prompt" id="what-is-a-prompt"></a>

Writing a prompt for an AI assistant or agent is like giving directions to a friend who's ready to help you with a task but needs clear instructions on what you want.

### 1. Define Business Context <a href="#id-1.-define-business-context" id="id-1.-define-business-context"></a>

Start by outlining the specific business the AI assistant will represent. Include key details such as the industry, product or service offerings, target customer base, and any unique selling points. This sets the stage for the AI to understand the environment it will operate within.

Copy

```
Your task is to provide customer support for [Business Name], a [Industry Type] company specializing in [Product/Service Offerings]. Our customers range from [Target Customer Base] who value [Unique Selling Points].
```

### 2. Add Basic Business Knowledge <a href="#id-2.-add-basic-business-knowledge" id="id-2.-add-basic-business-knowledge"></a>

Ensure the prompt includes instructions for the AI to access and utilize a wide range of information related to the business. This can include product manuals, FAQs, company policies, customer service scripts, and any other relevant data.

Copy

```
You have access to all our product manuals, FAQs, company policies, and customer service scripts. Use this information to answer queries accurately and provide solutions to our customers.
```

### 3. Tone and Language <a href="#id-3.-tone-and-language" id="id-3.-tone-and-language"></a>

The tone of communication is crucial in customer support. Specify the desired tone (e.g., friendly, professional, empathetic) and any language preferences or requirements. This helps the AI align its responses with the company's brand voice.

Copy

```
Communicate in a [Specify Tone] tone, maintaining a professional yet empathetic  approach. Use [Specify Language or Jargon] where appropriate, but ensure explanations  are clear and accessible to all customers.
```

### 4. Rules of Engagement <a href="#id-4.-rules-of-engagement" id="id-4.-rules-of-engagement"></a>

Outline specific guidelines for how the AI should interact with customers. This includes how to handle sensitive customer information, privacy considerations, escalation protocols for unresolved issues, and any limitations on the AI's role in customer support.

Copy

```
Always prioritize customer privacy and data protection. For unresolved issues, follow our  protocol by providing the customer with [Escalation Steps]. Do not attempt to resolve issues beyond your scope; instead, direct customers to [Next Steps].
```

### 5. Example Conversation <a href="#id-5.-example-conversation" id="id-5.-example-conversation"></a>

Offer examples of common customer queries and ideal responses. This helps the AI understand the types of questions it will encounter and the level of detail expected in its answers.

Copy

```
Example Queries:
- Query: 'How do I reset my product?'
- Ideal Response: 'To reset your product, please follow these steps: [...]'

- Query: 'What is your return policy?'
- Ideal Response: 'Our return policy allows for returns within 30 days of purchase, 
provided the product is in its original condition. For the full policy, visit [Link].'
```

### 6. Output Formatting <a href="#id-6.-output-formatting" id="id-6.-output-formatting"></a>

Specify how you want the AI to format its responses to customers. This ensures consistency and readability, making it easier for customers to follow instructions or understand the information provided.

Copy

```
Format your responses to customer inquiries using clear, concise language. When providing instructions or solutions, use bullet points or numbered steps for ease of understanding.
```

### 7. Step by Step Thinking <a href="#id-7.-step-by-step-thinking" id="id-7.-step-by-step-thinking"></a>

Guide the AI to approach problem-solving and query resolution in a logical, step-by-step manner. This not only aids in generating coherent and structured responses but also mirrors the thought process a human agent might use, enhancing the customer's experience.

Copy

```
When addressing customer queries, follow a logical problem-solving approach:
1. **Identify the Customer's Need:** Clarify the customer's issue or question to ensure you understand what they are asking.
2. **Gather Relevant Information:** Use the provided resources (FAQs, product manuals, policies) to find the information relevant to the customer's query.
3. **Formulate a Response:** Based on the information gathered, craft a response that directly addresses the customer's need. If the query involves troubleshooting, provide step-by-step instructions.
4. **Check for Completeness:** Before sending the response, ensure it fully addresses the query and is formatted for clarity.
5. **Offer Further Assistance:** End your response by asking if the customer needs more help, directing them to additional resources or escalation paths if necessary.
```


# AI Agent Settings

Control and update the name, description, display name and more for your AI Agent.

This is the most important area for your AI Agent because it is where you will customize the AI agent for each use case/ business.

<div align="left"><figure><img src="https://2664211534-files.gitbook.io/~/files/v0/b/gitbook-x-prod.appspot.com/o/spaces%2F3ZBK3xWNwSpAJ2dDxWAH%2Fuploads%2FKL0WLpPdKfEJ70OsBsNa%2FScreenshot%202025-07-14%20142430.png?alt=media&amp;token=a14044c1-d729-4fff-9e82-0ad8dc8a8436" alt="" width="375"><figcaption></figcaption></figure></div>

### Name <a href="#name" id="name"></a>

This is the internal name of the AI Agent in your account. This name is not seen by users as long as a display name is added as well.

<figure><img src="https://2664211534-files.gitbook.io/~/files/v0/b/gitbook-x-prod.appspot.com/o/spaces%2F3ZBK3xWNwSpAJ2dDxWAH%2Fuploads%2Fs7ERGycxgRxEpDynDQ9M%2FScreenshot%202025-07-14%20142522.png?alt=media&amp;token=138df18b-3db5-4385-844d-551c4afb0486" alt=""><figcaption></figcaption></figure>

### Display Name <a href="#display-name" id="display-name"></a>

This is the name shown to users on the chat widget.

This user-visible name represents your AI Agent. We advise including 'Al' for clarity. If this is not set, then AI Agent\`s name will be shown.

<figure><img src="https://2664211534-files.gitbook.io/~/files/v0/b/gitbook-x-prod.appspot.com/o/spaces%2F3ZBK3xWNwSpAJ2dDxWAH%2Fuploads%2FKeph3xMZRZEy8znJbku7%2FScreenshot%202025-07-14%20142641.png?alt=media&amp;token=d6f48d81-ecae-44fd-ab7f-1eb457fb7d22" alt=""><figcaption></figcaption></figure>

### Initial Messages <a href="#initial-messages" id="initial-messages"></a>

Enter the AI Agent initial message(s) to users, separated by a new line for multiple messages.

This message greets users upon their initial interaction with the AI Agent. To add multiple messages, separate them by new lines.

<figure><img src="https://2664211534-files.gitbook.io/~/files/v0/b/gitbook-x-prod.appspot.com/o/spaces%2F3ZBK3xWNwSpAJ2dDxWAH%2Fuploads%2FSMEMs5ulwFqxo4Hu2g1s%2FScreenshot%202025-07-14%20142737.png?alt=media&amp;token=1d729e0c-af96-444e-a1c4-2964479d91c8" alt=""><figcaption></figcaption></figure>

### Conversation Starters <a href="#conversation-starters" id="conversation-starters"></a>

Predefined clickable messages for user prompts. Separate multiple messages with new lines.

<figure><img src="https://2664211534-files.gitbook.io/~/files/v0/b/gitbook-x-prod.appspot.com/o/spaces%2F3ZBK3xWNwSpAJ2dDxWAH%2Fuploads%2FH38vCHuhUIRDHE7wVB8I%2FScreenshot%202025-07-14%20142940.png?alt=media&amp;token=7a822408-e970-499a-9c54-c9bc69d6d1cc" alt=""><figcaption></figcaption></figure>

#### Chat Widget Pop Up <a href="#chat-widget-pop-up" id="chat-widget-pop-up"></a>

When enabled this will open the entire chat widget to the user on the webpage.


# AI Chat Widget

Customize the look and feel of each AI agent to match the branding of any business.

[Customize Chat ](/ai-features/ai-chat-widget/customize-chat-widget-appearance)

[Widget Apperance](/ai-features/ai-chat-widget/customize-chat-widget-appearance)[<br>](https://docs.stammer.ai/stammer.ai-docs/ai-features/ai-agent-settings)


# Customize Chat Widget Appearance

This allows you to full customize the look, color, appearance and feel of the embeddable chat widget.

To customize the appearance of your AI agent's chat widget, click into any AI agent and then navigate to the Appearance tab. Here you will see a whole suite of options to customize pretty much every aspect of the chat widget.

On the right hand side there is a live preview of what your changes will look like.

<figure><img src="https://2664211534-files.gitbook.io/~/files/v0/b/gitbook-x-prod.appspot.com/o/spaces%2F3ZBK3xWNwSpAJ2dDxWAH%2Fuploads%2FCaQqLsrTyVHNEfK9j5DE%2FScreenshot%202025-07-14%20143611.png?alt=media&amp;token=9ae529a5-10d9-4075-bac9-3b758514e1f8" alt=""><figcaption></figcaption></figure>

### Font Size <a href="#font-size" id="font-size"></a>

Font size for the chat text in pixels.

<div align="left"><figure><img src="https://2664211534-files.gitbook.io/~/files/v0/b/gitbook-x-prod.appspot.com/o/spaces%2F3ZBK3xWNwSpAJ2dDxWAH%2Fuploads%2FG1uRNN1d7CDpmrDjWASl%2FScreenshot%202025-07-15%20114554.png?alt=media&amp;token=433a99a2-f712-4089-9161-e9e44fb83576" alt="" width="476"><figcaption></figcaption></figure></div>

### Font Family <a href="#font-family" id="font-family"></a>

Font family for the chat text.

<div align="left"><figure><img src="https://2664211534-files.gitbook.io/~/files/v0/b/gitbook-x-prod.appspot.com/o/spaces%2F3ZBK3xWNwSpAJ2dDxWAH%2Fuploads%2FIUKYTXr6YCtp5sT4MF4P%2FWhatsApp%20Image%202025-07-15%20at%2011.47.24_672242e6.jpg?alt=media&amp;token=cd880578-531d-4d27-9bf0-5115690f6db9" alt="" width="462"><figcaption></figcaption></figure></div>

### Subheading <a href="#subheading" id="subheading"></a>

Subheading for the chat widget, such as 'Online', 'Available', etc.

<div align="left"><figure><img src="https://2664211534-files.gitbook.io/~/files/v0/b/gitbook-x-prod.appspot.com/o/spaces%2F3ZBK3xWNwSpAJ2dDxWAH%2Fuploads%2FlotkIi12v9sZTwliPuVo%2FScreenshot%202025-07-15%20114812.png?alt=media&amp;token=4053c471-7eff-4df9-b79d-1d77ec8ac65d" alt="" width="476"><figcaption></figcaption></figure></div>

### AI Agent Icon <a href="#chatbot-icon" id="chatbot-icon"></a>

Displayed in the chat widget header as the AI Agent image.

Supported file extensions are png, jpg, jpeg and Ideal logo size is 32x32 pixels.

<div align="left"><figure><img src="https://2664211534-files.gitbook.io/~/files/v0/b/gitbook-x-prod.appspot.com/o/spaces%2F3ZBK3xWNwSpAJ2dDxWAH%2Fuploads%2FCjvFfVkedRPvQn5C5buO%2FScreenshot%202025-07-14%20143715.png?alt=media&amp;token=17119078-507d-4e7e-a563-33597298686d" alt="" width="317"><figcaption></figcaption></figure></div>

### Chat Input Placeholder <a href="#chat-input-placeholder" id="chat-input-placeholder"></a>

Enter the text that will be displayed as a hint in the chat input field.

<div align="left"><figure><img src="https://2664211534-files.gitbook.io/~/files/v0/b/gitbook-x-prod.appspot.com/o/spaces%2F3ZBK3xWNwSpAJ2dDxWAH%2Fuploads%2FYDPdtg1ztl4x2sgLlZEI%2FScreenshot%202025-07-15%20114913.png?alt=media&amp;token=2dcced7a-ec31-4d7b-aa43-da500bb42575" alt="" width="473"><figcaption></figcaption></figure></div>

### Send Message Button <a href="#send-message-button" id="send-message-button"></a>

Upload a custom send message button. Defaults to a standard button if not provided. Supported file extensions are png, jpg, jpeg and Ideal logo size is 32x32 pixels.

<div align="left"><figure><img src="https://2664211534-files.gitbook.io/~/files/v0/b/gitbook-x-prod.appspot.com/o/spaces%2F3ZBK3xWNwSpAJ2dDxWAH%2Fuploads%2FaxDshNDIgeYrUsbKVvKi%2FScreenshot%202025-07-15%20114958.png?alt=media&amp;token=b03c136b-9e2e-4156-934d-87b5d48cb3de" alt="" width="478"><figcaption></figcaption></figure></div>

### Customize Colors <a href="#customize-colors" id="customize-colors"></a>

This section allows you to customize all the different colors of the platform.

<div align="left"><figure><img src="https://2664211534-files.gitbook.io/~/files/v0/b/gitbook-x-prod.appspot.com/o/spaces%2F3ZBK3xWNwSpAJ2dDxWAH%2Fuploads%2FGX9JB5BiB4bG8048qywQ%2FScreenshot%202025-07-15%20115047.png?alt=media&amp;token=19d9d480-429e-4b97-9cfd-fe104add3cbd" alt="" width="563"><figcaption></figcaption></figure></div>

### Widget Boarder <a href="#widget-boarder" id="widget-boarder"></a>

Border radius of the widget in pixels.

<div align="left"><figure><img src="https://2664211534-files.gitbook.io/~/files/v0/b/gitbook-x-prod.appspot.com/o/spaces%2F3ZBK3xWNwSpAJ2dDxWAH%2Fuploads%2FCknCVPxT3j1oYZG7XNIm%2FScreenshot%202025-07-15%20115047.png?alt=media&amp;token=d211c488-d262-4870-abf7-7728c1b4ebe6" alt="" width="563"><figcaption></figcaption></figure></div>

### Widget Background <a href="#widget-background" id="widget-background"></a>

Widget Background Preference

<div align="left"><figure><img src="https://2664211534-files.gitbook.io/~/files/v0/b/gitbook-x-prod.appspot.com/o/spaces%2F3ZBK3xWNwSpAJ2dDxWAH%2Fuploads%2FDRoi4YyMkCsZ9wnR238S%2FScreenshot%202025-07-15%20115047.png?alt=media&amp;token=3fa588c6-6d78-4e57-89bb-26c000d2ad39" alt="" width="563"><figcaption></figcaption></figure></div>

### Size of the Chat Widget <a href="#size-of-the-chat-widget" id="size-of-the-chat-widget"></a>

Adjust the size of the chat widget to small, medium or large.

<div align="left"><figure><img src="https://2664211534-files.gitbook.io/~/files/v0/b/gitbook-x-prod.appspot.com/o/spaces%2F3ZBK3xWNwSpAJ2dDxWAH%2Fuploads%2FsFkDoBrVMxFAEYcZtr9f%2FScreenshot%202025-07-14%20143839.png?alt=media&amp;token=d1497f6a-a7f0-432b-bf4c-fb9243452baf" alt="" width="563"><figcaption></figcaption></figure></div>

### Tagline <a href="#tagline" id="tagline"></a>

<div align="left"><figure><img src="https://2664211534-files.gitbook.io/~/files/v0/b/gitbook-x-prod.appspot.com/o/spaces%2F3ZBK3xWNwSpAJ2dDxWAH%2Fuploads%2FJU8Ne1kbahDC5AxlK6vL%2FScreenshot%202025-07-14%20144015.png?alt=media&amp;token=88136eac-ea92-4142-8d0e-dbba03c312bc" alt="" width="563"><figcaption></figcaption></figure></div>

### Chat Bubble Icon <a href="#chat-bubble-icon" id="chat-bubble-icon"></a>

This is the icon that appears on your site before a user clicks to open the chat.

<div align="left"><figure><img src="https://2664211534-files.gitbook.io/~/files/v0/b/gitbook-x-prod.appspot.com/o/spaces%2F3ZBK3xWNwSpAJ2dDxWAH%2Fuploads%2FwQJwUDOM7NpbfAmsau5M%2FScreenshot%202025-07-15%20115401.png?alt=media&amp;token=47f9a8a0-a5e4-4b79-a4fb-000801536fa0" alt="" width="464"><figcaption></figcaption></figure></div>

### AI Agent Status Messages <a href="#ai-agent-status-messages" id="ai-agent-status-messages"></a>

Enable to show status messages from the AI agent in the chat widget which are displayed to the user while the AI is processing a response.

<div align="left"><figure><img src="https://2664211534-files.gitbook.io/~/files/v0/b/gitbook-x-prod.appspot.com/o/spaces%2F3ZBK3xWNwSpAJ2dDxWAH%2Fuploads%2F5Bw81CqiP9Vbe02llqCt%2FScreenshot%202025-07-14%20144115.png?alt=media&amp;token=4c0041fc-9de9-43c5-be4e-881e3f53771f" alt="" width="375"><figcaption></figcaption></figure></div>

### Chat Avatar Icon <a href="#chat-avatar-icon" id="chat-avatar-icon"></a>

This image appears inside the chat window next to your bot’s messages.

<div align="left"><figure><img src="https://2664211534-files.gitbook.io/~/files/v0/b/gitbook-x-prod.appspot.com/o/spaces%2F3ZBK3xWNwSpAJ2dDxWAH%2Fuploads%2FgyUQLyOsUPuEtBPee72V%2FScreenshot%202025-07-14%20144207.png?alt=media&amp;token=f19e960b-481b-4570-962b-4a7cb7e21d33" alt="" width="196"><figcaption></figcaption></figure> <figure><img src="https://2664211534-files.gitbook.io/~/files/v0/b/gitbook-x-prod.appspot.com/o/spaces%2F3ZBK3xWNwSpAJ2dDxWAH%2Fuploads%2Fmm2UrTq0VY6K2J9J4Oto%2FScreenshot%202025-07-14%20144341.png?alt=media&amp;token=81644934-ec22-41d6-b656-726fe9bbf89c" alt=""><figcaption></figcaption></figure></div>

[<br>](https://docs.stammer.ai/stammer.ai-docs/ai-features/ai-chat-widget)


# Chat Widget Voice / Audio

Information about how to enable voice in & out for the website chat widget.

#### What is Chat Widget Voice / Audio? <a href="#what-is-chat-widget-voice" id="what-is-chat-widget-voice"></a>

There is now the ability to have voice / audio functionality within your website chat widget.

This means that, when enabled there will be the option to click a voice icon and speak into the bot, as well as be able to hear the AI's response verbally.

Voice In = Voice to Text

Voice Out = Text to Voice

#### How to Enable Voice / Audio. <a href="#how-to-enable-voice" id="how-to-enable-voice"></a>

1. Navigate to the update tab for any AI agent
2. Click into the advanced settings
3. Enable/ Disable this feature based on what you want the user to be able to do

<figure><img src="https://2664211534-files.gitbook.io/~/files/v0/b/gitbook-x-prod.appspot.com/o/spaces%2F3ZBK3xWNwSpAJ2dDxWAH%2Fuploads%2FVjwOYczTuLivix5f3Lxt%2FScreenshot%202025-07-14%20152040.png?alt=media&amp;token=c443fec6-9080-4de7-a2c1-17221b7c8ba8" alt=""><figcaption></figcaption></figure>

#### The Future of Voice / Audio <a href="#the-future-of-voice" id="the-future-of-voice"></a>

We will be implementing other native integrations that will allow for connections to OpenAI's Whisper and ElevenLabs. This will bring customized voices along with hundreds of higher quality options.


# Leads 2.0

Learn how to extract data from a conversation immediately, when a conversation ends or after 1-hour of no activity.

### Leads 2.0 Feature Documentation <a href="#leads-2.0-feature-documentation" id="leads-2.0-feature-documentation"></a>

Leads 2.0 is an improved system for extracting specific data from conversations with your AI agent. It allows you to collect structured information such as names, email addresses, appointment times, preferences, and other custom data points without requiring a separate prompt.

### When is Data Extracted? <a href="#when-is-data-extracted" id="when-is-data-extracted"></a>

Learn about the 3 different options for when data is extracted from the conversation.

#### 1. Immediate Data Extraction <a href="#id-1.-immediate-data-extraction" id="id-1.-immediate-data-extraction"></a>

* As soon as the user has answered all of the questions, the AI agent will immediately extract their responses and send the data to the notification email/ webhook.
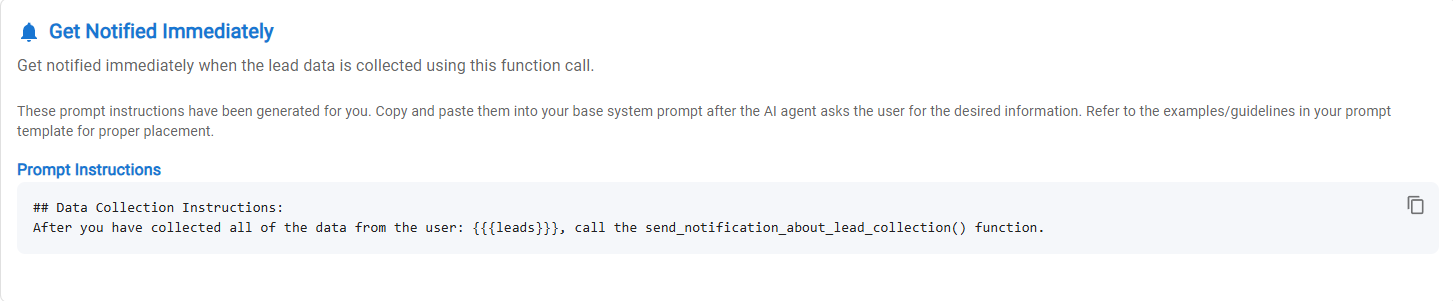
* Based on the values you enter, the system will generate a prompt that you can copy and paste into your base system prompt.
* Replace the Custom\_Variables with the data you want to extract and add the following prompt to your base system prompt after AI agent data collection instructions:

Copy

```
## Data Collection Instructions:
After you have collected all of the data from the user: {Custom_Variable1, Custom_Variable2...}, call the send_notification_about_lead_collection() function.
```

<div align="left"><figure><img src="https://2664211534-files.gitbook.io/~/files/v0/b/gitbook-x-prod.appspot.com/o/spaces%2F3ZBK3xWNwSpAJ2dDxWAH%2Fuploads%2FLYrx0mb2RdXZMI9JyNzo%2FScreenshot%202025-07-15%20115726.png?alt=media&amp;token=939b8c78-3d2b-4817-b0da-30e6cff33eee" alt="" width="563"><figcaption></figcaption></figure></div>

#### 2. Conversation Ended <a href="#id-2.-conversation-ended" id="id-2.-conversation-ended"></a>

* As soon as a conversation has been ended by the user (refreshing the chat widget, starting a new conversation etc.) the system will review the entire conversation and extract the data values.

#### 3. After 1-Hour of No Activity <a href="#id-3.-after-1-hour-of-no-activity" id="id-3.-after-1-hour-of-no-activity"></a>

* If the AI agent is having a conversation with a user and the user doesn't respond for 1 hour, the AI agent will review the conversation and extract any available answers.

***

#### How to Use Leads 2.0 <a href="#how-to-use-leads-2.0" id="how-to-use-leads-2.0"></a>

**Step 1: Configure Your Main System Prompt**

Include questions in your main system prompt that ask for the specific information you want to collect. These instructions should match the data values you enter in the leads tab to extract.

The base prompt tells the AI agent what questions to ask.

The Leads tab tells the AI agent which answers/data to extract.

Copy

```
(Example)
After answering the user's first question, ask them for their email address.
```

**Step 2: Define Data Extraction in the Leads Tab**

1. Navigate to the "Leads" tab in your AI agent settings
2. Define the data points you want to extract (e.g., email address)
3. Choose where to send the extracted data:
   * Email notification
   * Webhook URL (for CRM integration, Zapier workflows, etc.)

**Example of Data Points You Can Extract**

* Email addresses
* Names
* Phone numbers
* Appointment times
* Custom preferences
* Any specific information relevant to your business

**Additional Features**

* **Smart Extraction**: The system can intelligently extract information (e.g., extract a name from a personalized email address like "<john@example.com>")
* **Partial Information Handling**: If a user only answers some of your questions, the system will still extract and forward the data they did provide
* **Data Storage**: All extracted lead data is stored within the system and visible in the conversations tab
* **CRM Integration**: Easily pipe extracted data to CRMs like Go High Level through webhooks

#### Compatibility Note <a href="#compatibility-note" id="compatibility-note"></a>

If you have existing AI agents, you'll see both "Legacy Leads" and "Leads 2.0" tabs. Existing agents will continue to function with the Legacy Leads system, while new agents can take advantage of the improved Leads 2.0 functionality.

#### Working with the Summary Feature <a href="#working-with-the-summary-feature" id="working-with-the-summary-feature"></a>

Leads 2.0 complements the existing Summary tab functionality, allowing you to extract both structured data (specific fields) and unstructured data (conversation summaries) from your AI interactions.

***

### Full Example Prompt <a href="#full-example-prompt" id="full-example-prompt"></a>

The example prompt below instructs the AI agent to answer the user's first question, then ask for their email address. After the user provides their email address, the AI agent will extract the data and send it to the saved webhook. After it sends that data the AI agent will ask the user if they want to schedule a meeting which then uses the scheduling prompt inside the scheduling tab.

Copy

```
// General Prompt Guidelines: 
// When a line starts with two slashes like this line, it is considered a comment and will not be read by the AI agent.
// Replace the following content with your own company information or use one of the template prompts provided
// REMEMBER: Build your prompts iteratively (one change at a time). Make one change, and then test it. Etc...
// Prompts Should be written in English and then you can ask the AI agent to translate (If needed for your use case)
// This example handles all languages
// OR You can be more specific: This prompt is in English but I want you to interact with the users in Spanish
// Link based appointment scheduling (uncomment the below line, if needed)
// If a user wants to schedule a meeting or book an appointment, send them to this link: {YOUR_CALENDLY_LINK}
// Replace the placeholders in square brackets [] with your own information

## Basic Instructions:
- You are a helpful assistant for Agent Supply
- Your job is to answer questions customers send to you. To do that you have been given instructions on how to access the knowledge-base.
- If you do not have an answer to a question and it's not in the knowledge-base then let the user know that you do not have the answer to their question. You can say something like, "Hmm, I'm not sure."
- Keep your answers as concise as possible while still giving the required information.
- Do not break character. Avoid answering questions that are not at all relevant to the business.
- Speak to the User in the language they speak to you in.


// Data Collection Guidelines:
// Modify this section to match your use case and when you want the AI agent to ask the questions and collect the answers
// Make sure you tell the AI agent to ask the user for the all of info you have defined in the Leads data collection tab
// After the user has answered all of the questions, the AI agent will extract their answers and send the data via email or webhook
// Update the custom_variables to match the data values you want to extract from the conversation
// Note: If you are asking for the user's email, make sure you have defined 'email' in the leads tab as a piece of data to extract.
// The function prompt for immediate data extraction works best when the instruction is added right after the AI agent has asked the user the questions to collect the data.

## Lead Data Collection Instructions:
- Answer the first question from the user, then ask the user for their email address.
- After you have collected all of the data from the user: {email}, call the send_notification_about_lead_collection() function.
- After you have sent the lead collection data, offer the user the option to schedule a meeting.
```

***

#### Key Differences from Leads (Legacy - Leads 1.0) <a href="#key-differences-from-leads-legacy-leads-1.0" id="key-differences-from-leads-legacy-leads-1.0"></a>

| Feature                 | Legacy Leads                                    | Leads 2.0                                                                   |
| ----------------------- | ----------------------------------------------- | --------------------------------------------------------------------------- |
| Prompt Requirement      | Requires a custom prompt                        | Prompt is provided for you                                                  |
| Integration             | Data extraction separate from main conversation | Data extraction integrated into main system prompt                          |
| Implementation          | More complex setup                              | Simplified setup                                                            |
| Partial Data Collection | Limited handling of incomplete responses        | Successfully extracts partial data even if users don't answer all questions |


# Leads (Legacy)

"Leads" allows you to extract data from users (like email address or phone number) when they interact with the AI Agent.

[Overview of Lead Generation](/ai-features/leads-legacy/overview-of-lead-generation)

[Lead Collection Form Fields](/ai-features/leads-legacy/lead-collection-form-fields)

[Lead Collection Webhook URL](/ai-features/leads-legacy/lead-collection-webhook-url)

[Lead Collection Email Notification](/ai-features/leads-legacy/lead-collection-email-notification)


# Overview of Lead Generation

Lead generation allows you to extract data from users when they interact with the AI Agent.

Within the context of Agent Supply there are 2 ways of generating leads.

<div align="left"><figure><img src="https://2664211534-files.gitbook.io/~/files/v0/b/gitbook-x-prod.appspot.com/o/spaces%2F3ZBK3xWNwSpAJ2dDxWAH%2Fuploads%2FRaPqyXmxDiisiDLYZi4q%2FScreenshot%202025-07-14%20152827.png?alt=media&amp;token=e72baf4e-c7a3-485e-b271-f9cbf1ef0dd4" alt="" width="170"><figcaption></figcaption></figure></div>

#### 1. Collect in Form <a href="#id-1.-collect-in-form" id="id-1.-collect-in-form"></a>

Collect in Form before starting a conversation.

When you use this option a form will be shown to users that they will have to answer in order to start a conversation with a AI Agent.

<div align="left"><figure><img src="https://2664211534-files.gitbook.io/~/files/v0/b/gitbook-x-prod.appspot.com/o/spaces%2F3ZBK3xWNwSpAJ2dDxWAH%2Fuploads%2FSx7sXPPU4KoYENfjqqhs%2FScreenshot%202025-07-14%20152933.png?alt=media&amp;token=4b69a5ac-2f61-428d-9eff-adb576ee2665" alt="" width="563"><figcaption></figcaption></figure></div>

#### 2. Collect in Conversation (Advanced) <a href="#id-2.-collect-in-conversation-advanced" id="id-2.-collect-in-conversation-advanced"></a>

Collect in chat during conversation with AI Agent

<div align="left"><figure><img src="https://2664211534-files.gitbook.io/~/files/v0/b/gitbook-x-prod.appspot.com/o/spaces%2F3ZBK3xWNwSpAJ2dDxWAH%2Fuploads%2FydthJ0UQ8UrG0aWhX8Sy%2FScreenshot%202025-07-14%20153114.png?alt=media&amp;token=d9355e9e-8f99-453c-b33c-e306d2748a43" alt="" width="563"><figcaption></figcaption></figure></div>


# Lead Collection Form Fields

Describing what each of the form fields represent.

### Predefined Fields <a href="#predefined-fields" id="predefined-fields"></a>

Create your own custom field OR pick a predefined field to auto-fill its corresponding values.

<div align="left"><figure><img src="https://2664211534-files.gitbook.io/~/files/v0/b/gitbook-x-prod.appspot.com/o/spaces%2F3ZBK3xWNwSpAJ2dDxWAH%2Fuploads%2FxTIrO2WmAtKM49dRKUly%2FScreenshot%202025-07-14%20153114.png?alt=media&amp;token=d3a3382c-249a-4119-97e0-00d5b8ec34e8" alt="" width="563"><figcaption></figcaption></figure></div>

### Collection Method <a href="#collection-method" id="collection-method"></a>

Select the method used for collecting data.

<div align="left"><figure><img src="https://2664211534-files.gitbook.io/~/files/v0/b/gitbook-x-prod.appspot.com/o/spaces%2F3ZBK3xWNwSpAJ2dDxWAH%2Fuploads%2FHa2DZrakJlESjm3jHcbK%2FScreenshot%202025-07-15%20120010.png?alt=media&amp;token=e22063f3-2bac-42dc-9c88-5da495381d9c" alt="" width="257"><figcaption></figcaption></figure></div>

#### In Form Collection <a href="#in-form-collection" id="in-form-collection"></a>

This will create a custom form that is shown to users before a conversation is started with a AI Agent.

#### In Chat Collection <a href="#in-chat-collection" id="in-chat-collection"></a>

This will train the AI Agent to ask the user these questions inside the chat conversation.

***

### Field Label <a href="#field-label" id="field-label"></a>

<div align="left"><figure><img src="https://2664211534-files.gitbook.io/~/files/v0/b/gitbook-x-prod.appspot.com/o/spaces%2F3ZBK3xWNwSpAJ2dDxWAH%2Fuploads%2FOe43iHpW0dC8X1podETn%2FScreenshot%202025-07-15%20120338.png?alt=media&amp;token=72b513d7-8f45-45b7-b4c8-459372e5e567" alt="" width="332"><figcaption></figcaption></figure></div>

[<br>](https://docs.stammer.ai/stammer.ai-docs/ai-features/leads-legacy/overview-of-lead-generation)


# Lead Collection Webhook URL

When enabled, lead data will be sent to the specified URL upon collection.

After the AI Agent has collected all of the data from the user, it will compile all of that data together and then send it in a JSON format to the URL provided.

Example:

<div align="left"><figure><img src="https://2664211534-files.gitbook.io/~/files/v0/b/gitbook-x-prod.appspot.com/o/spaces%2F3ZBK3xWNwSpAJ2dDxWAH%2Fuploads%2FlQYNyjUXiaLlJxmlheGD%2FScreenshot%202025-07-15%20120724.png?alt=media&amp;token=1e746e78-3fd4-49d5-a1f2-ee597b29605c" alt="" width="511"><figcaption></figcaption></figure></div>

When this data is received by the CRM or other platform, the data will be formatted so you can easily extract custom values and match them with their custom fields in the client's CRM.

<div align="left"><figure><img src="https://2664211534-files.gitbook.io/~/files/v0/b/gitbook-x-prod.appspot.com/o/spaces%2F3ZBK3xWNwSpAJ2dDxWAH%2Fuploads%2F0UNiuWfTf5A4T362Mb7C%2FScreenshot%202025-07-15%20120812.png?alt=media&amp;token=70841ce2-4943-4d5f-8c10-6c010cf8152b" alt="" width="563"><figcaption></figcaption></figure></div>

**1. Log into Agent Supply**

* Access your **Agent Supply** dashboard.
* Choose the specific **AI form or lead generation tool** you're using to collect user data.

**2. Open Integration Settings**

* Within Agent Supply, navigate to the **Integrations** or **Webhook/API** settings section for the form.
* This is where you configure where the lead data should go.

**3. Copy the Webhook URL from GoHighLevel**

* Open your **GoHighLevel** dashboard.
* Go to **Settings → Webhooks** (or **Triggers**, depending on setup).
* Create or retrieve a **Webhook URL** that will receive incoming lead data.
* Copy that URL.

**4. Paste Webhook into Agent Supply**

* Back in Agent Supply, paste the **GHL Webhook URL** into the webhook destination field.
* This tells Agent Supply to send new lead submissions to GoHighLevel.

**5. Map Form Fields**

* Match each form field from Agent Supply to its corresponding field in GoHighLevel:
  * First Name → First Name
  * Email → Email
  * Phone → Phone
  * And so on...
* This ensures the data is correctly placed in the GHL contact record.

**6. Submit a Test Lead**

* Use your Agent Supply form to submit a **test lead**.
* Then check your **GoHighLevel CRM** to verify the contact appears correctly with the expected data.

**7. Troubleshooting**

If the test doesn't work:

* Double-check the **Webhook URL** is correct and live.
* Make sure **field names are mapped properly**.
* Look at any **logs or error messages** in Agent Supply or GHL to diagnose issues.

***

#### 🔁 Why Use This Integration?

* **Saves Time**: No more copying and pasting lead info.
* **Improves Accuracy**: Automation avoids typos and delays.
* **Enables Automation**: As soon as the lead hits GoHighLevel, you can trigger emails, SMS, calls, or workflows.

[<br>](https://docs.stammer.ai/stammer.ai-docs/ai-features/leads-legacy/lead-collection-form-fields)


# Lead Collection Email Notification

When enabled, lead data will be sent to the provided email upon collection.

When a new lead is collected, we will send an email to this email address.

<div align="left"><figure><img src="https://2664211534-files.gitbook.io/~/files/v0/b/gitbook-x-prod.appspot.com/o/spaces%2F3ZBK3xWNwSpAJ2dDxWAH%2Fuploads%2FbYJvBNe2szH9qXFX0ETN%2FScreenshot%202025-07-15%20120859.png?alt=media&amp;token=a29695f9-324a-4629-8722-d700a74a025d" alt="" width="511"><figcaption></figcaption></figure></div>

[<br>](https://docs.stammer.ai/stammer.ai-docs/ai-features/leads-legacy/lead-collection-webhook-url)


# Sending Lead Data to Zapier

### 🔁 Objective:

Send **Lead data** (like name, email, phone, tags, etc.) from **Agent Supply** to **Zapier**, enabling you to automate actions such as CRM updates, email follow-ups, or Slack notifications.

***

### ✅ Prerequisites:

1. A **Zapier** account
2. Access to your **Agent Supply dashboard**
3. An **Agent Supply assistant** that collects lead data (e.g., via form, user message, or custom flow)

***

### 🧩 Step-by-Step Integration (Zapier Webhook)

#### **Step 1: Create a Zap in Zapier**

1. Log in to [Zapier.com](https://zapier.com)
2. Click **“Create Zap”**
3. For the **Trigger**, choose:\
   → **Webhooks by Zapier**\
   → Event: **Catch Hook**\
   → Click **Continue**

#### **Step 2: Copy Your Webhook URL**

1. Zapier will provide a **custom webhook URL**\
   (e.g., `https://hooks.zapier.com/hooks/catch/123456/abcde`)
2. **Copy** this URL for use in Agent Supply

***

### 🔗 Step 3: Set up a Webhook in Agent Supply

#### Option A: Use an **Action Step** inside your Agent Supply Assistant

If you're using an agent with defined actions or a flow:

1. Go to your agent’s flow in the Agent Supply dashboard.
2. Locate the step where the lead is captured.
3. Add an **"HTTP Request"** or **Webhook** step.
4. Set the method to **POST**
5. Paste in the **Zapier Webhook URL**
6. Structure the JSON payload. Example:

   ```json
   jsonCopiarEditar{
     "name": "{{user.name}}",
     "email": "{{user.email}}",
     "phone": "{{user.phone}}",
     "tags": "{{user.tags}}"
   }
   ```

   *(Replace `{{user.variable}}` with the actual variable names used in your assistant.)*
7. Save and deploy the flow.

#### Option B: Use Global Webhooks (if Agent Supply provides this)

Some Agent Supply projects allow **global webhook configuration**:

1. Navigate to project settings or integrations.
2. Look for “Webhook” or “Lead Forwarding” settings.
3. Paste the Zapier Webhook URL.
4. Define what event will trigger the webhook (e.g., “on lead creation”).
5. Customize the payload if needed.

***

### 🧪 Step 4: Test the Integration

1. Return to your Zap in Zapier.
2. Click **“Test Trigger”**
3. Submit a lead via your Agent Supply assistant (preview or live).
4. Zapier should receive the lead data.
5. Click **Continue** when the test succeeds.

***

### ⚙️ Step 5: Add Action Steps in Zapier

Once Zapier has received the lead data, you can choose what happens next:

* Send it to a CRM (e.g., Salesforce, Pipedrive, HubSpot)
* Log it in a spreadsheet
* Add to your email list
* Send internal alerts (e.g., Slack or Gmail)

Example:

1. Choose **“Create Contact in HubSpot”**
2. Map the lead fields (e.g., email → email)
3. Save and **turn your Zap on**

***

### ✅ Integration Complete!

Now each time a lead interacts with your **Agent Supply assistant**, the captured data is instantly sent to Zapier, triggering your custom workflow.


# Sending Lead Data to GHL

### ✅ Goal:

Send lead data (e.g., name, email, phone) from **Agent Supply** (via an Agent or Form) to **GoHighLevel (GHL)**, so it appears as a Contact or triggers a Workflow in GHL.

***

### 🔧 Step-by-Step: Send Lead Data from **Agent Supply** to **GoHighLevel**

***

#### **Step 1: Prepare Your GoHighLevel Webhook URL**

1. **Log in to your GoHighLevel account**.
2. Navigate to:
   * **Settings** > **Company Settings** > **API Keys** → *Copy your API key*.
3. To trigger a workflow via webhook:
   * Go to **Workflows**.
   * Click **+ Create Workflow** → choose **Start from Scratch**.
   * Add a **Webhook Trigger**.
   * Copy the **Webhook URL** generated — you'll need this in Agent Supply.

***

#### **Step 2: Go to Your Agent in Agent Supply**

1. In **Agent Supply**, open the **Agent** (bot) where you’re capturing leads.
2. Insert a **"Send Webhook"** action after the data is collected (e.g., after a form or dialogue).
3. Paste the **GoHighLevel Webhook URL** into the webhook step.

***

#### **Step 3: Format the Payload Correctly for GHL**

Use this JSON structure in the webhook action:

```json
jsonCopiarEditar{
  "firstName": "{{lead.firstName}}",
  "lastName": "{{lead.lastName}}",
  "email": "{{lead.email}}",
  "phone": "{{lead.phone}}",
  "source": "AgentSupplyBot",
  "customField": "value"
}
```

> Replace variables with the fields your **Agent Supply agent** collects.

***

#### **Step 4: Test the Webhook from Agent Supply**

1. In Agent Supply, use the **“Test Webhook”** feature with sample data.
2. Go to GoHighLevel:
   * Check **Contacts** to confirm receipt of the lead.
   * If you’re triggering a workflow, go to **Workflow → History** to see if the trigger fired.

***

#### **Step 5: Optional – Use the GHL API for Direct Integration**

If you want to **skip the GHL webhook trigger** and directly create a contact, use an **API call** in Agent Supply:

**Endpoint**:

```
bashCopiarEditarhttps://rest.gohighlevel.com/v1/contacts/
```

**Headers**:

```json
jsonCopiarEditar{
  "Authorization": "Bearer YOUR_API_KEY",
  "Content-Type": "application/json"
}
```

**Body**:

```json
jsonCopiarEditar{
  "firstName": "John",
  "lastName": "Doe",
  "email": "john@example.com",
  "phone": "+1234567890",
  "locationId": "YOUR_LOCATION_ID",
  "customField": "value"
}
```

In Agent Supply:

* Use the **API Call** block.
* Set method to **POST**, enter the URL, headers, and body.
* Make sure your data variables (e.g., `{{lead.email}}`) are correctly mapped.

***

### 🧠 Pro Tips

* Use **Test Mode** in GoHighLevel to verify the trigger and payload.
* Validate emails and phone numbers in Agent Supply before sending.
* Use **custom fields** in GHL to capture additional info like UTM tags, lead source, etc.
* You can chain multiple actions in Agent Supply: e.g., save to Airtable + send to GHL.


# Sending Lead Data to Zoho CRM

Tutorial on how to setup a webhook from Zoho and connect to your Agent Supply account.

#### ✅ Prerequisites

Make sure you have:

1. A **Zoho CRM account** with API access enabled.
2. A valid **OAuth 2.0 access token** from Zoho (guide below).
3. An **Agent Supply account** with access to build **Chains** (Agent workflows).

***

#### 🧩 Step-by-Step: Send Lead Data to Zoho CRM via Agent Supply

***

**Step 1: Generate Your Zoho CRM API Access Token**

Zoho uses OAuth 2.0. Here’s how to get the token:

1. Go to Zoho API Console.
2. Create a **new client** (select **Server-based Applications**).
3. Set a **redirect URI** (it can be dummy if using the "Self Client").
4. Generate a code using the **"Self Client"** tab.
5. Exchange the code for an access token using this command:

```bash
bashCopiarEditarcurl --request POST \
  --url https://accounts.zoho.com/oauth/v2/token \
  --data 'grant_type=authorization_code&client_id=YOUR_CLIENT_ID&client_secret=YOUR_CLIENT_SECRET&redirect_uri=YOUR_REDIRECT_URI&code=YOUR_CODE'
```

Save the `access_token` and `refresh_token` securely.

***

**Step 2: Capture Lead Data in Agent Supply**

1. Go to the **Chain Builder** in Agent Supply.
2. Add steps to collect user data:
   * Name
   * Email
   * Company
   * Phone
3. Store each piece of data in variables (e.g., `{{first_name}}`, `{{email}}`, etc.).

***

**Step 3: Add HTTP Request Node to Your Chain**

1. Insert an **HTTP request** node after capturing lead data.
2. Configure it with the following:

**🌍 URL**

```
rubyCopiarEditarhttps://www.zohoapis.com/crm/v2/Leads
```

**🔧 Method**

```
nginxCopiarEditarPOST
```

**🔐 Headers**

```json
jsonCopiarEditar{
  "Authorization": "Zoho-oauthtoken YOUR_ACCESS_TOKEN",
  "Content-Type": "application/json"
}
```

**🧾 Body (JSON)**

Fill in Zoho CRM fields using your stored variables:

```json
jsonCopiarEditar{
  "data": [
    {
      "Company": "{{company}}",
      "Last_Name": "{{last_name}}",
      "First_Name": "{{first_name}}",
      "Email": "{{email}}",
      "Phone": "{{phone}}",
      "Lead_Source": "Agent Supply"
    }
  ]
}
```

> Replace variable names with whatever you're using in your Chain.

***

**Step 4: Test Your Chain**

* Run a test session through your Chain.
* Submit lead data.
* Go to **Zoho CRM > Leads** to confirm the lead was created.

***

**Step 5: Handle Token Expiry (Optional)**

Access tokens expire (usually after 1 hour). To handle this:

* Use your `refresh_token` to generate new tokens on demand.
* You can set up a separate Agent Supply Chain to refresh the token:

```bash
bashCopiarEditarcurl --request POST \
  --url https://accounts.zoho.com/oauth/v2/token \
  --data 'refresh_token=YOUR_REFRESH_TOKEN&client_id=YOUR_CLIENT_ID&client_secret=YOUR_CLIENT_SECRET&grant_type=refresh_token'
```

Store and reuse the new access token in your Agent Supply Chain.

***

#### ✅ Summary

| Step | Description                                    |
| ---- | ---------------------------------------------- |
| 1    | Get Zoho OAuth access token                    |
| 2    | Collect lead data in Agent Supply Chain        |
| 3    | Use HTTP request node to send data to Zoho CRM |
| 4    | Test and confirm leads appear in Zoho          |
| 5    | (Optional) Automate token refresh              |

#### &#x20; <a href="#tutorial-from-zoho" id="tutorial-from-zoho"></a>


# Scheduling

There are a few options for how you can your AI agent to schedule meetings.

The easiest and most reliable way to get more meetings scheduled is to train the AI agent to provide a calendar link that users can click and schedule a meeting.

[AI Scheduling - Simplified](/ai-features/scheduling/ai-scheduling-simplified)

The more advanced option is to enable in-chat scheduling. This will connect your AI agent directly to a Google calendar and work with the users to find the best available time. Please note, that this is an experimental custom function. Changing or updating the prompt may cause scheduling to not work.

[AI Scheduling - Experimental (Beta)](/support/resources/sales-deck/ai-agency-101/ai-saas-funnel-explained)


# AI Scheduling - Simplified

The easiest way to create an AI agent that can schedule appointments is to provide a calendar link when appropriate.

### Base System Prompt for Scheduling <a href="#base-system-prompt-for-scheduling" id="base-system-prompt-for-scheduling"></a>

In your base system prompt simply add in a line that states:

```
If a user wants to schedule a meeting or book an appointment, 
send them to this link: https://yourlink
```

When a user wants to schedule a meeting they will be able to click the link and book the meeting.

For more advanced in-chat scheduling functionality go here:

[AI Scheduling - Experimental (Beta)](/ai-features/scheduling/ai-scheduling-experimental-beta)[<br>](https://docs.stammer.ai/stammer.ai-docs/ai-features/scheduling)


# AI Scheduling - Experimental (Beta)

This is an advanced, custom function for AI agents to execute and is in beta. Use with caution.

This allows your A.I. agent to see your current availability via your connected calendar and then be able to automatically schedule appointments directly to the calendar.

[What is Scheduling?](/ai-features/scheduling/ai-scheduling-experimental-beta/what-is-scheduling)[Calendar Integration](/ai-features/scheduling/ai-scheduling-experimental-beta/calendar-integration)[Appointment Scheduling Activation](/ai-features/scheduling/ai-scheduling-experimental-beta/appointment-scheduling-activation)[Appointment Scheduling Webhook URL](/ai-features/scheduling/ai-scheduling-experimental-beta/appointment-scheduling-webhook-url)[Appointment Scheduling Email Notification](/ai-features/scheduling/ai-scheduling-experimental-beta/appointment-scheduling-email-notification)[Appointment Scheduling Base System Prompt](/ai-features/scheduling/ai-scheduling-experimental-beta/appointment-scheduling-base-system-prompt)


# What is Scheduling?

<figure><img src="https://2664211534-files.gitbook.io/~/files/v0/b/gitbook-x-prod.appspot.com/o/spaces%2F3ZBK3xWNwSpAJ2dDxWAH%2Fuploads%2FGCxUVmySfRMLgZz36f5W%2FScreenshot%202025-07-15%20105615.png?alt=media&amp;token=7f5a5a7b-cd6d-448d-aa44-3a0fc47ddaa3" alt=""><figcaption></figcaption></figure>

Our AI Agent now offers a convenient appointment scheduling feature. This feature integrates seamlessly with Google Calendar to give you real-time availability slots. Here's how you can make the most out of it:

**Setting Up:**

1. Turn on the scheduling feature using the provided switch/button.
2. Connect your Google Calendar. The system will guide you through a secure OAuth process to ensure your data remains private.
3. Set your working hours. In the initial version, set a uniform time for all days. For example, you might work 9 a.m. to 5 p.m. This will be displayed in your time zone, but stored in UTC for consistency.

**Using the Feature:**

1. When a user wishes to schedule an appointment, the AI Agent displays available times based on your Google Calendar.
2. Once a time is chosen, the AI Agent verifies its availability.
3. The user provides their email address, and the AI Agent schedules the appointment. It can also set up a Google Hangout Meet automatically.
4. Both you and the user receive a notification through Google's default system once the appointment is booked.

**Additional Info:**

Remember, the AI Agent requires the user's email to schedule an appointment. This ensures you can send a Google Meet invite if needed.

<br>


# Calendar Integration


# Google Calendar

The Google calendar integration allows you to connect your Google calendar directly to an A.I. Agent.

<div align="left"><figure><img src="https://2664211534-files.gitbook.io/~/files/v0/b/gitbook-x-prod.appspot.com/o/spaces%2F3ZBK3xWNwSpAJ2dDxWAH%2Fuploads%2F9lV0VxV1DxPNAvgvkejB%2FScreenshot%202025-07-15%20121641.png?alt=media&amp;token=7597ece8-e61b-4ab2-81a8-530ed81b9d66" alt="" width="563"><figcaption></figcaption></figure></div>

We created a standalone brandless integration called "AI Meeting Scheduler". This allows you or your clients to connect their Google calendar to their AI Agent without seing anything related to Agent Supply.

By default the AI Agent will only look at the main calendar. If you have other calendars inside your Google account, make sure the main calendar is able to see all of the availability.

<div align="left"><figure><img src="https://2664211534-files.gitbook.io/~/files/v0/b/gitbook-x-prod.appspot.com/o/spaces%2F3ZBK3xWNwSpAJ2dDxWAH%2Fuploads%2FhTp5E8IM78b5UuK0Hky3%2FScreenshot%202025-07-15%20122037.png?alt=media&amp;token=d189a256-b7fc-4370-a47c-ef550aaa5ebb" alt="" width="563"><figcaption></figcaption></figure></div>


# Appointment Scheduling Activation

This is how you enable in-chat scheduling for your AI agent.

<div align="left"><figure><img src="https://2664211534-files.gitbook.io/~/files/v0/b/gitbook-x-prod.appspot.com/o/spaces%2F3ZBK3xWNwSpAJ2dDxWAH%2Fuploads%2FKr7l1ZbcM3hbj3NUceDD%2FScreenshot%202025-07-15%20122225.png?alt=media&amp;token=f547efae-4bc6-42a9-acce-7153723c428c" alt="" width="563"><figcaption></figcaption></figure></div>

**How Appointment Scheduling Works**

**Overview:**

Our AI agent now offers a convenient appointment scheduling feature. This feature integrates seamlessly with Google Calendar to give you real-time availability slots. Here's how you can make the most out of it:

**Setting Up:**

1. Turn on the scheduling feature using the provided switch/button.
2. Connect your Google Calendar. The system will guide you through a secure OAuth process to ensure your data remains private.
3. Set your working hours. In the initial version, set a uniform time for all days. For example, you might work 9 a.m. to 5 p.m. This will be displayed in your time zone, but stored in UTC for consistency.

**Using the Feature:**

1. When a user wishes to schedule an appointment, the AI agent displays available times based on your Google Calendar.
2. Once a time is chosen, the AI agent verifies its availability.
3. The user provides their email address, and the AI agent schedules the appointment. It can also set up a Google Hangout Meet automatically.
4. Both you and the user receive a notification through Google's default system once the appointment is booked.

**Additional Info:**

Remember, the AI agent requires the user's email to schedule an appointment. This ensures you can send a Google Hangout Meet invite if needed.<br>


# Appointment Scheduling Webhook URL

Stay up to date and notified about all new appointments.

Enter in a webhook URL where you want data to be sent.

For example, enter in a webhook URL from Zapier or your CRM and every time a new meeting is scheduled the data below will be sent.

<div align="left"><figure><img src="https://2664211534-files.gitbook.io/~/files/v0/b/gitbook-x-prod.appspot.com/o/spaces%2F3ZBK3xWNwSpAJ2dDxWAH%2Fuploads%2FVDrPy41S80Gu6wbD9CRN%2FScreenshot%202025-07-15%20123029.png?alt=media&amp;token=24f642d0-13a0-4927-862e-15092ed00e5c" alt="" width="563"><figcaption></figcaption></figure></div>

If you don't want to use the webhook, you can use the email notification.


# Appointment Scheduling Email Notification

Send an email every time there is a new appointment scheduled.

When a new appointment is scheduled, we will send an email to this email address.

<div align="left"><figure><img src="https://2664211534-files.gitbook.io/~/files/v0/b/gitbook-x-prod.appspot.com/o/spaces%2F3ZBK3xWNwSpAJ2dDxWAH%2Fuploads%2FcUL2mCp2u3JS36FbFqBD%2FScreenshot%202025-07-15%20123250.png?alt=media&amp;token=dfcdf10f-9921-4246-b831-b7c840250789" alt="" width="563"><figcaption></figcaption></figure></div>


# Appointment Scheduling Base System Prompt

The appointment scheduling base system prompt is the special prompt that is appended to your main base system prompt to auto-train your AI agent to know how to schedule an appointment.

If you know what you are doing, you can modify this additional prompt as needed.

<div align="left"><figure><img src="https://2664211534-files.gitbook.io/~/files/v0/b/gitbook-x-prod.appspot.com/o/spaces%2F3ZBK3xWNwSpAJ2dDxWAH%2Fuploads%2Fous1PhJ3S4mWvLRbWHQ4%2FScreenshot%202025-07-15%20123355.png?alt=media&amp;token=fe760412-66ef-4e97-9cd3-6ce6569b9425" alt="" width="563"><figcaption></figcaption></figure></div>


# The Appointment Scheduling Functions & Customizing the Appointment Scheduling Prompt

This page explains the appointment scheduling functions that we provide to the AI agents and also gives some tips on customizing the appointment scheduling prompt.

### Intro <a href="#intro" id="intro"></a>

Appointment scheduling in Agent Supply is entirely driven by the prompts you write for your AI Agent This tutorial will walk you through the process of customizing the appointment scheduling prompt to fit your specific requirements.

### Example Appointment Scheduling Prompt <a href="#example-appointment-scheduling-prompt" id="example-appointment-scheduling-prompt"></a>

```
// ...Rest of your prompt above...

You are an appointment scheduling bot that answers questions. You will always prompt the user to see if they want to schedule an appointment.

// Change the above if your scenario is different

# How to schedule an appointment

## Get the timezone from the user

When the user wants to schedule an appointment you will ask them what timezone they are in. 

## Get the available times

Then you will use the get_available_times function, passing the user's timezone converted by you to a valid IANA Time Zone string, to get the available times for the agent.

    Example call: get_available_times(timezone="America/Los_Angeles") 

## Propose the times to the user

Then I want you to propose the next 3 time slots the agent is available in the following format:
    1. Mon 11-04-2024 11:00AM PST
    2. Mon 11-04-2024 11:30AM PST
    3. Mon 11-04-2024 2:00PM PST
    
Show these timeframes using markdown for clarity. Each day and its available time should be displayed on separate lines for easy readability.

If the user doesn't like any of those times give them 3 others that will work.

## Scheduling the appointment

When the user picks a time, you will then get their email. If user has already provided their email, then ask if they want to use the same one, else ask for their email.

Once you have their email and the time you will then use the schedule_appointment function to schedule the appointment by calling it with the email and the time in RFC 3339 format.

    Example call: schedule_appointment(email="someone@example.com", desired_time_rfc3339="2024-11-04T09:30:00-08:00")

Important Note: This is just an example call for you to understand, please do not use this email, instead, ask the user for their email and use that.

## Informing the user the appointment has been scheduled

When the appointment has been successfully scheduled, go ahead and include the link that the function gives you to the successfully scheduled appointment.
```

However, occasionally users do want to modify or customize their appointment scheduling prompt.

### Note on the "Appointment Scheduling Base System Prompt" <a href="#note-on-the-appointment-scheduling-base-system-prompt" id="note-on-the-appointment-scheduling-base-system-prompt"></a>

In Agent Supply, there is an "Appointment Scheduling Base System Prompt" that gets appended to the main base system prompt. This separation allows for clearer organization, but you can choose to merge the appointment scheduling prompt into your main base system prompt if desired.

### Customizing the Appointment Scheduling Prompt <a href="#customizing-the-appointment-scheduling-prompt" id="customizing-the-appointment-scheduling-prompt"></a>

If you do want to customize the appointment scheduling prompt, you will need to know about the two appointment scheduling functions we provide to the AI so that it knows how to call our code and get the function scheduled.

#### The get\_available\_times function <a href="#the-get_available_times-function" id="the-get_available_times-function"></a>

```
get_available_times(timezone="America/Los_Angeles")
```

The get\_available\_times function takes in a [valid IANA timezone string](https://en.wikipedia.org/wiki/List_of_tz_database_time_zones) and returns the a list of time ranges that the user whose calendar is connected to the agent is available.

**Example Output of the function**

```
Thu 04-04-2024 06:00PM-05:00PM PDT
Fri 04-05-2024 12:00PM-01:00PM PDT
Fri 04-05-2024 03:00PM-05:00PM PDT 
Mon 04-08-2024 12:00PM-01:00PM PDT 
Mon 04-08-2024 03:00PM-05:00PM PDT 
Tue 04-09-2024 12:00PM-01:00PM PDT 
Tue 04-09-2024 03:00PM-05:00PM PDT 
Wed 04-10-2024 12:00PM-01:00PM PDT 
Wed 04-10-2024 03:00PM-05:00PM PDT
```

#### The schedule\_appointment function <a href="#the-schedule_appointment-function" id="the-schedule_appointment-function"></a>

```
schedule_appointment(email="someone@example.com", desired_time_rfc3339="2023-11-04T09:30:00-08:00")
```

This is the actual function that schedules the appointment on the calendar of the user who is connected to the AI Agent.

It takes in two parameters:

* The email of the person chatting with the agent who wants to schedule the appointment
* The desired time to schedule the appointment in RFC 3339 format.

**Example Output of the function**

```
Appointment scheduled successfully. Event Link: https://www.google.com/calendar/event?eid=YmwxNjM1cjhjaGRqdWgkeajlkgjreNGtpZzAgdGl
```


# Integrations

This is how you can integrate AI Agents into any business. The most common and popular integration that 99% of agencies and businesses use is the option to embed it on a website.

[Embed AI Agent on a Website](/ai-features/integrations/embed-ai-agent-on-a-website)

There are also native integrations for certain social media channels which allow you to place an A.I. Agent on anywhere.

[Instagram DM](/ai-features/integrations/instagram-dm)[Facebook Messenger](/ai-features/integrations/facebook-messenger)[WhatsApp](/ai-features/integrations/whatsapp)[Zapier App](/ai-features/integrations/zapier-app)


# Embed AI Agent on a Website

How to embed an AI agent on a website

To embed an AI Agent on a website, you can go to any AI Agent in your dashboard and go to the Integrations tab to see the embed code and available settings to control when the AI Agent pops up.

![](https://docs.stammer.ai/stammer.ai-docs/~gitbook/image?url=https%3A%2F%2F1359281993-files.gitbook.io%2F%7E%2Ffiles%2Fv0%2Fb%2Fgitbook-x-prod.appspot.com%2Fo%2Fspaces%252FkLIQnOFYHkQtdWxUzzFE%252Fuploads%252FfvPx4HPczY44BkZUG4tY%252FScreenshot%25202025-02-07%2520at%25205.21.56%25E2%2580%25AFPM.jpg%3Falt%3Dmedia%26token%3Dcabf6147-8489-4197-8b09-f500f9b1051f\&width=768\&dpr=4\&quality=100\&sign=ce304580\&sv=2)

## Squarespace <a href="#squarespace" id="squarespace"></a>

### 🔧 How to Embed the Agent Supply Chat Widget into a Squarespace Site (Step by Step)

***

#### 1. **Introduction**

This guide walks you through embedding the **Agent Supply** chat widget into your Squarespace site so visitors can chat with your AI or support agent directly.

***

#### 2. **Obtain the Widget Code**

* Log into your **Agent Supply** account (or create one).
* Go to your dashboard and find the **embed code** for your chat widget.
* This is usually a JavaScript or HTML snippet meant to be copied and embedded into your website.

***

#### 3. **Access Squarespace Editor**

* Open your Squarespace website and navigate to the page where you'd like the chat to appear.
* Click **Edit** to enter the page builder.

***

#### 4. **Insert a Code Block**

* Click the **+** button to add a new block to the page.
* Select the **“Code”** block.
* Paste the **Agent Supply** chat widget code into the code block.
* You can place this in the page footer or any section where you want the widget to appear.

***

#### 5. **Save and Publish**

* Click **Apply** or **Save** after pasting the code.
* Exit the editor and **publish** the page to make your changes live.

***

#### 6. **Verify the Widget on the Live Site**

* Visit your live Squarespace site in a regular browser window.
* You should see the **Agent Supply** chat widget — usually a floating icon in the bottom corner.
* Open it to make sure it works and is connected to your **Agent Supply** account.

***

#### 7. **Troubleshooting (if the widget doesn’t show up)**

* Make sure:
  * You used a **Code** block (not text).
  * The script was pasted correctly.
  * You saved and published changes.
  * There are no conflicting scripts.
  * You’ve cleared your browser cache.

***

#### 8. **Conclusion**

Your site now has the **Agent Supply** chat widget active, enabling real-time AI-powered chat. You can further customize its appearance or behavior in your **Agent Supply** dashboard.

***

#### ✅ Summary Table

| Step | Action                                       |
| ---- | -------------------------------------------- |
| 1    | Copy chat embed code from **Agent Supply**   |
| 2    | Open Squarespace editor on your desired page |
| 3    | Add a **Code** block and paste the code      |
| 4    | Save and publish                             |
| 5    | Verify the chat is working on the live site  |

## Shopify <a href="#shopify" id="shopify"></a>

### ✅ **How to Embed the Agent Supply Chat Widget into a Shopify Store**

#### 1. **Introduction & Overview**

* The goal is to enable real-time AI Agent interaction on your storefront using **Agent Supply**.

***

#### 2. **Accessing Your Shopify Theme Code**

* In your Shopify admin panel, go to **Online Store → Themes**.
* Find your current active theme and click **“Actions” → “Edit code”**.

***

#### 3. **Opening the Correct File**

* In the left sidebar, open the **`theme.liquid`** file under the **Layout** section.
* This file contains your site’s overall HTML structure — the place to insert the widget code.

***

#### 4. **Inserting the Agent Supply Widget Code**

* Copy the **Agent Supply chat widget script** (usually a `<script>` tag provided by Agent Supply).
* Paste it **just before the closing `</body>` tag** inside `theme.liquid`.

***

#### 5. **Saving and Previewing**

* Click **Save** in the upper-right corner of the code editor.
* Go to your store’s homepage and **refresh** the page.
* You should now see the **Agent Supply chat widget** — typically a floating chat bubble.

***

#### 6. **Testing the Widget**

* Click the chat bubble to open the Agent Supply assistant.
* A welcome message should appear, showing that the widget is active and connected.

***

#### 7. **Customization Options**

* You can customize the widget via the **Agent Supply dashboard**, such as:
  * Changing the greeting message
  * Adjusting theme colors
  * Selecting which Agent to deploy
* Advanced users can modify the script’s behavior directly in the embed code.

***

#### 8. **Summary**

* To embed the **Agent Supply** widget:
  1. Go to **Edit Code** in Shopify.
  2. Open `theme.liquid`.
  3. Paste the Agent Supply script before `</body>`.
  4. Save and refresh.

## Wix <a href="#wix" id="wix"></a>

#### 🎯 Step 1: Copy the Agent Supply Embed Code

* Open your **Agent Supply** dashboard and navigate to your AI Agent.
* Go to the **Integrations** or **Embed Chatbot** section.
* Copy the provided HTML/JavaScript embed snippet, which usually includes a `<script>` tag plus a `<div>` with a unique widget ID.

***

#### 🧩 Step 2: Add an Embed Element in Wix

* In the Wix Editor, click **Add Elements** → **Embed Code**.
* Choose **Embed HTML** (or sometimes called "Custom HTML/iFrame").
* Drag the element onto the page where you want the widget to appear.

***

#### ✏️ Step 3: Insert the Code Snippet

* Click the embedded box on your page.
* In the settings panel, select **Enter Code**.
* Paste the **Agent Supply** embed snippet into the HTML field, then click **Apply**.

***

#### 📏 Step 4: Adjust Sizing & Responsiveness

* By default, Wix uses static pixel dimensions.
* Replace `width="560"`/`height="315"` with `width="100%"` and `height="100%"` in the `<iframe>` or container so the widget adapts fluidly across screen sizes.

***

#### ✅ Step 5: Preview & Publish

* Use the Wix preview mode to check positioning and widget behavior.
* Once satisfied, **Publish** your site.
* Visitors will now see and can interact with the **Agent Supply** chat widget.

***

#### 🔧 Notes & Troubleshooting

* Ensure the embed code uses **HTTPS**, as Wix enforces SSL for embeds.
* If the widget doesn't show:
  * Confirm the script isn’t blocked by browser extensions.
  * Check for JavaScript errors via browser console.
* Some users note that embed elements sometimes need to be added either via the standard editor or via **Advanced Settings → Custom Code** for site-wide or footer placement.

***

#### Summary Table

| Task                | Action                                         |
| ------------------- | ---------------------------------------------- |
| Grab embed code     | From **Agent Supply** dashboard → Integrations |
| Insert embed on Wix | Add → Embed Code → HTML → paste snippet        |
| Make it responsive  | Set width/height to 100%                       |
| Check & publish     | Preview then go live                           |


# Zapier App

Agent Supply offers seamless integration with Zapier, enabling you to automate workflows by connecting your AI agents to over 3,000 applications without any coding.

#### 🔌 How Agent Supply Integrates with Zapier

Agent Supply provides a native Zapier app that allows you to create "Zaps"—automated workflows that connect your AI agents with various apps.This integration supports both triggers (events that start a workflow) and actions (tasks performed in response).(zapier.com)

**Common Use Cases:**

* **Messaging Platforms:** Automatically send responses from your AI agents to platforms like Slack, Facebook Messenger, and Microsoft Outlook.
* **CRM Systems:** Update or create new records in CRMs such as HubSpot or Google Sheets based on interactions with your AI agents.
* **Scheduling Tools:** Integrate with tools like Google Calendar to manage appointments and availability.
* **Communication Channels:** Connect with services like Twilio or OpenPhone to handle SMS and voice communications.

#### 💡 Getting Started

1. **Create a Zap:** Set up a workflow by selecting a trigger app and an action app, then configure the necessary fields.
2. **Test and Activate:** Run tests to ensure the workflow operates as expected, then activate your Zap to begin automation.


# GoHighLevel (GHL)

Sit an AI Agent behind any communication channel in GHL to auto talk with customers.

Integrating an AI Agent with your client's GHL account is one of the most powerful ways to get up and running really quickly.

This is useful because you can utilize the existing communication channels that the client has already setup and use GHL's automation builder to create unique scenarios where an A.I. Agent can take over the conversation.

1. **Create a New Workflow in GoHighLevel (GHL)**
   * Navigate to **Automations > Workflows** in your GHL dashboard.
   * Click on **Create New Workflow**, give it a name, and save it.
   * Enable **Allow re-entry** in the **Settings** tab to allow multiple interactions.
2. **Add a Trigger**
   * Click on **Add Trigger** and choose **Customer Replied**.
   * Select the communication channel where Agent Supply’s AI will respond (e.g., SMS, Facebook Messenger).
3. **Set Up a Custom Webhook Action**
   * Click on **+ Add Action** and select **Webhook**.
   * Set the **Event Type** to **POST**.
   * In the **URL** field, enter your **Agent Supply API endpoint** (replace the Agent Supply endpoint).
     * Example: `https://api.agentsupply.ai/v1/messages`
4. **Configure Headers**
   * Add a header with:
     * **Key**: `Authorization`
     * **Value**: `Token YOUR_AGENT_SUPPLY_API_TOKEN`
       * Replace `YOUR_AGENT_SUPPLY_API_TOKEN` with your Agent Supply API token.
5. **Set Up the Request Body**
   * Use the following parameters:
     * **chatbot\_uuid**: Unique identifier for your Agent Supply bot (replaceAgent Supply\`s `chatbot_uuid`).
     * **query**: Use GHL variable `{{message.body}}` to capture the user's message.
     * **user\_key**: Use `{{contact.id}}` to identify the user.
6. **Test the Integration**
   * Click **Save Action** and then **Save Workflow**.
   * Test the webhook by sending a message to see if Agent Supply correctly responds.
7. **Finalize Workflow**
   * After successful testing, adjust the parameters as needed (for instance, replace `{{message.body}}` if Agent Supply requires different formatting for the user’s message).
   * Save your workflow changes.

#### 📌 Notes:

* **Replace Agent Supply Tokens and API URLs**: Be sure that any specific references to Agent Supply (like API URLs and tokens) are replaced with those for Agent Supply.
* **Adapt Response Format**: The response format from Agent Supply might differ from Agent Supply Review Agent Supply’s API documentation to ensure you're handling responses correctly.

#### 🚀 Test Your Workflow

After making these adjustments, test the workflow by simulating conversations through your GHL platform. Make sure that Agent Supply responds as expected.

***

Want to know how to send collected information to GHL?

[Sending Lead Data to GHL](/ai-features/leads-legacy/sending-lead-data-to-ghl)[<br>](https://docs.stammer.ai/stammer.ai-docs/ai-features/integrations/zapier-app)


# Instagram DM

Set up your AI Agent to handle Instagram DMs by heading to the Integrations tab and following the connection steps. This will automate responses, engage with followers instantly, and streamline your m

To connect a Agent Supply agent to Instagram, you have two options:

1️⃣ Native Integration: Go to the Integrations tab and follow the steps to connect directly.

2️⃣ API & Third-Party Tools: Use platforms like Zapier, HighLevel, or HubSpot to integrate via API for more customization and automation.

Choose the method that fits your workflow best and start automating your DMs! 🚀

#### Connect to Instagram with Agent Supply <a href="#connect-to-instagram-with-stammer" id="connect-to-instagram-with-stammer"></a>

Instantly connect Instagram DMs to your AI Agent. When you click connect youll be brought trhough a series of steps to connect to your Instagram account to authorize.

<div align="left"><figure><img src="https://2664211534-files.gitbook.io/~/files/v0/b/gitbook-x-prod.appspot.com/o/spaces%2F3ZBK3xWNwSpAJ2dDxWAH%2Fuploads%2F9iDp7AXUi5XSFdq4QcTj%2FScreenshot%202025-07-15%20130511.png?alt=media&amp;token=d5eacdb0-f349-49df-b298-3d0fcf4ed708" alt="" width="563"><figcaption></figcaption></figure></div>

#### Connect to Instagram with API <a href="#connect-to-instagram-with-api" id="connect-to-instagram-with-api"></a>

You can also connect to your Instagram account via API. For example if you've already connected your Instagram through your CRM, you can use the API to have the AI agent take over the conversation from within the CRM.

<br>


# Facebook Messenger

Connect your custom AI agents directly to your Facebook Page and messenger

Agent Supply uses the Official Facebook integration with Meta's API. You can connect any AI to any of your connect Facebook Pages. Simply sign in and select the page you want to use. A Facebook page can only have one AI agent connected at a time.

Step 1: Click on the Facebook integration

<div align="left"><figure><img src="https://2664211534-files.gitbook.io/~/files/v0/b/gitbook-x-prod.appspot.com/o/spaces%2F3ZBK3xWNwSpAJ2dDxWAH%2Fuploads%2FqHRfb0Pt52u4XcEODuXW%2FScreenshot%202025-07-15%20130731.png?alt=media&amp;token=be80a83e-a38b-4c7d-8785-67079e8859c1" alt="" width="563"><figcaption></figcaption></figure></div>

Step 2: Create/ Connect your Facebook Business account

<div align="left"><figure><img src="https://2664211534-files.gitbook.io/~/files/v0/b/gitbook-x-prod.appspot.com/o/spaces%2F3ZBK3xWNwSpAJ2dDxWAH%2Fuploads%2Fd5WQ0oVEFZmR8fOyrWp3%2FScreenshot%202025-07-15%20130839.png?alt=media&amp;token=5e14a6a4-8e0c-4feb-8580-b5afa6b929a8" alt="" width="563"><figcaption></figcaption></figure></div>

Step 3: Enable the AI Agent to be active

You're done! The integration is now setup and when you message the Facebook Messenger, in a few seconds the AI agent will respond.

[<br>](https://docs.stammer.ai/stammer.ai-docs/ai-features/integrations/instagram-dm)


# WhatsApp

This is how you connect directly to your business WhatsApp phone number.

Agent Supply uses the Official WhatsApp integration with Meta's API. You sign into your Facebook account and then will be prompted to either create or connect an existing WhatsApp number. Business WhatsApp phone numbers from Meta may have an additional expense depending on your location and sending category billed directly from [Meta](https://business.whatsapp.com/products/platform-pricing).

Step 1: Select an AI Agent from your dashboard

Step 2: Navigate to the Integrations tab

<div align="left"><figure><img src="https://2664211534-files.gitbook.io/~/files/v0/b/gitbook-x-prod.appspot.com/o/spaces%2F3ZBK3xWNwSpAJ2dDxWAH%2Fuploads%2FslwKmd0eDFQmrpniPQHI%2FScreenshot%202025-07-15%20131050.png?alt=media&amp;token=bad5c497-d483-4e87-be53-039b41394727" alt="" width="563"><figcaption></figcaption></figure></div>

Step 3: Click on the WhatsApp integration

<div align="left"><figure><img src="https://2664211534-files.gitbook.io/~/files/v0/b/gitbook-x-prod.appspot.com/o/spaces%2F3ZBK3xWNwSpAJ2dDxWAH%2Fuploads%2Fdp3lwBU89MIcyOQKAGqN%2FScreenshot%202025-07-15%20131143.png?alt=media&amp;token=c1acc107-41c7-40ab-807f-ef2467e02dec" alt="" width="563"><figcaption></figcaption></figure></div>

Step 4: Create/ Connect your WhatsApp Business account

<figure><img src="https://2664211534-files.gitbook.io/~/files/v0/b/gitbook-x-prod.appspot.com/o/spaces%2F3ZBK3xWNwSpAJ2dDxWAH%2Fuploads%2Fk72ggXBdOEONucaNeNT9%2FScreenshot%202025-07-15%20131244.png?alt=media&amp;token=0c7b9981-0486-452a-b9f5-229f39e9a514" alt=""><figcaption></figcaption></figure>

Step 5: Enable the AI Agent to be active

You're done! The integration is now setup and when you message the WhatsApp phone number, in a few seconds the AI agent will respond.


# Troubleshooting

Here are a handful of tutorials you can review to help you solve common questions people have asked in the past.

[How to Respond in Any Language](/ai-features/troubleshooting/how-to-respond-in-any-language)[Responses are Too Long](/ai-features/troubleshooting/responses-are-too-long)[Debug Mode](/ai-features/troubleshooting/debug-mode)[Clickable Links in Responses](/ai-features/troubleshooting/clickable-links-in-responses)


# How to Respond in Any Language

In the Base System Prompt, ensure that you specify that the AI agent should respond in the same language as the one in which the question is asked. This means that if a user asks a question in English, the AI agent will respond in English. If the question is in Spanish, the agent will answer in Spanish, and so on. This ensures a more natural and coherent interaction, as the AI will adapt to the user's preferred language without needing additional instructions.

To implement this effectively, you would add a directive in the system prompt such as:\
"Always answer in the language of the user's input."

This way, no matter the language of the question, the agent's response will match, enhancing user experience and making communication smoother.


# Responses are Too Long

Are your AI Agent responses way too long?

You can simply modify your base system prompt to include a statement like

Copy

```
Limit each response to be only one sentence long

Stay short & concise when giving a response
```

Giving an example of a "short" response can also help ensure the AI agent gives simpler response.

After updating your Base System Prompt, click ‘Re-train AI Agent’ and voila you’ll know have one sentence responses that are shorter.

Another Option:

Copy

```
Your responses will be sent via SMS, so limit each of your responses to be only 1 sentence long.
Make sure each of your responses only contains text, no markdown or html.
```


# Debug Mode

Enable this feature to learn more about what information is being pulled from the knowledge base and what information is being sent to OpenAI.

<div align="left"><figure><img src="https://2664211534-files.gitbook.io/~/files/v0/b/gitbook-x-prod.appspot.com/o/spaces%2F3ZBK3xWNwSpAJ2dDxWAH%2Fuploads%2FQvg9rCTLhxn7RDKediKy%2FScreenshot%202025-07-15%20134027.png?alt=media&amp;token=a8c8cab8-9e03-452f-a43a-99110f28f7a0" alt=""><figcaption></figcaption></figure></div>

#### 1. **Understand the Issue**

* **Reproduce the Problem**: Try to replicate the issue by providing the same input or queries to the AI Agent. Take note of where the responses start to become problematic.
* **Identify Patterns**: Is the issue occurring with specific types of questions, keywords, or contexts? Understanding these patterns can help narrow down the problem.

#### 2. **Examine the Input**

* **Input Validation**: Check if the input to the model is well-formed. Incorrect or ambiguous input can cause inaccurate or nonsensical responses.
* **Preprocessing**: Ensure that any input preprocessing (like tokenization, normalization, or encoding) is functioning as expected.

#### 3. **Check Model Outputs**

* **Logging Responses**: If the platform supports logging, review the raw output from the model. This allows you to track how the model interprets the input and generates the response.
* **Response Quality**: Analyze whether the model's output is coherent, relevant, and follows the expected conversational flow.

#### 4. **Evaluate Data Used for Training**

* **Training Data**: Check if the training data is diverse and comprehensive enough to cover the types of queries you're encountering. Insufficient training data may lead to incorrect or vague responses.
* **Biases and Gaps**: Look for any patterns that indicate the model is failing in certain areas, which could point to biases or gaps in the data.

#### 5. **Model Fine-tuning**

* **Parameter Tuning**: If you're working with a model that can be fine-tuned, you might need to adjust parameters or retrain the model on a more specific dataset that reflects the desired output.
* **Error Feedback**: Continuously provide feedback on incorrect responses to improve model performance over time. Some platforms support an active learning approach to refine the model.

#### 6. **Use Debugging Tools**

* **Logging and Monitoring**: Implement tools to monitor model behavior, like logging frameworks, error tracking, and performance analytics. This can help pinpoint where things go wrong.
* **Visualization**: Use tools like attention visualization or layer-wise analysis to understand how the model processes the input and produces outputs.

#### 7. **Evaluate Context and Memory**

* **Contextual Understanding**: If the AI Agent is failing to maintain conversation context or provide accurate follow-up answers, evaluate how it is managing context and memory.
* **State Management**: Make sure the system is correctly tracking state between user inputs. If the model is not retaining information across turns, responses may become disjointed or irrelevant.

#### 8. **Examine API Calls (if applicable)**

* **API Responses**: If your AI Agent uses external APIs to generate answers, check the responses from those APIs. Sometimes the issue lies outside the AI Agent itself, in the data being pulled or the way it is processed.
* **Error Handling**: Ensure proper error handling for situations when the API is down or returns an unexpected result.

#### 9. **Test with Different User Personas**

* **User Diversity**: Try running tests with different types of user personas to see if certain demographics or question types lead to poorer results.
* **Simulate Different Scenarios**: Input different user intents and emotional tones to ensure that the AI Agent is adaptable and can handle diverse interactions.

#### 10. **Collaborate with Support**

* **Agent Supply Support**: If you’re unable to resolve the issue, consider reaching out to Agent Supply's support team. They may have additional tools or insights into debugging your specific implementation.

By systematically following these steps, you should be able to identify the source of the issue and improve the AI Agent's performance. If you're working within Agent Supply's specific platform, there may also be documentation or community resources that can provide more tailored advice.


# Clickable Links in Responses

This will explain how to get clickable links in your AI responses.

#### Step 1. Update the prompt <a href="#step-1.-update-the-prompt" id="step-1.-update-the-prompt"></a>

Inside your base system prompt you need to instruct the AI agent to include links in its responses. To do this, you can update the prompt like so:

```
Include the website links in markdown format at the end of your answers when applicable.
```

#### Step 2. Check knowledge base <a href="#step-2.-check-knowledge-base" id="step-2.-check-knowledge-base"></a>

Inside your AI agent's knowledge base you can scrape a website to add all of it's pages and data. Most website will have page names and links that are included with this data (Agent Supply will automatically include all links by default). If, for whatever reason there are no links provided then you can add them via a document or text like \[Name of URL]\(<https://thiswouldbeyoururl.com>)

#### Step 3. Test & Refine <a href="#step-3.-test-and-refine" id="step-3.-test-and-refine"></a>

Enable debug mode so you can see the data being used by the AI to generate it's answer. If you ask a question and its not giving you the response you like, it's most likely because its returning the irrelevant data. Make sure you only add relevant information to your knowledge base.

[Debug Mode](/ai-features/troubleshooting/debug-mode)


# Need Help?

We’re here to help —

## Need Help?

### Getting Started

## [Agent Supply](https://www.agentsupply.ai/contact)

"Feel free to reach out to us through the 'Contact' section on agentsupply.ai, where our team is always ready and happy to assist you with any questions or concerns you may have. Whether it's a simple inquiry or more in-depth assistance, we ensure you'll receive a timely and helpful response. Additionally, we have an AI-powered agent available 24/7 to provide instant support, offering you the convenience of having your questions answered at any time of the day or night. We're here to ensure you have the best experience possible and are committed to providing you with the answers and support you need whenever you need it."


# Security & Compliance

[Data Privacy & Security Report](https://docs.stammer.ai/stammer.ai-docs/support/security-and-compliance/data-privacy-and-security-report)[GDPR](https://docs.stammer.ai/stammer.ai-docs/support/security-and-compliance/gdpr)[Terms & Conditions](https://docs.stammer.ai/stammer.ai-docs/support/security-and-compliance/terms-and-conditions)[Privacy Policy](https://docs.stammer.ai/stammer.ai-docs/support/security-and-compliance/privacy-policy)[Data Processing Agreement](https://docs.stammer.ai/stammer.ai-docs/support/security-and-compliance/data-processing-agreement)[AI Model Data Usage](https://docs.stammer.ai/stammer.ai-docs/support/security-and-compliance/ai-model-data-usage)


# Data Privacy & Security Report

**🛡️ Security**\
At Agent Supply, your data security is our top priority. We are committed to safeguarding your information through the use of best-in-class security practices, infrastructure, and technology.

**🔐 Data Encryption**\
All data transmitted to and from Agent Supply is encrypted using industry-standard TLS (Transport Layer Security) protocols. Sensitive data at rest is encrypted using AES-256 to ensure it remains protected from unauthorized access.

**💻 Secure Infrastructure**\
Our platform is hosted on secure, enterprise-grade infrastructure providers with built-in physical and network security measures. We utilize distributed servers with automated failovers and 24/7 monitoring to ensure high availability and disaster resilience.

**💡 Access Control**\
Access to customer data is strictly controlled. Only authorized personnel with a legitimate business need are granted access, and all access is logged and monitored. We employ strict role-based access controls (RBAC) and multi-factor authentication (MFA) across our systems.

**🐞 Vulnerability Management**\
We conduct regular vulnerability scans, penetration testing, and code reviews. Our engineering team follows secure coding practices and is trained to identify and address potential security flaws early in the development cycle.

**🤖 AI Model Security**\
AI agents deployed through Agent Supply operate within isolated environments and do not access customer data unless explicitly configured to do so. All AI interactions are logged and auditable.

**📜 Compliance & Best Practices**\
We align our internal policies and procedures with security frameworks such as ISO 27001 and GDPR. We are committed to continual improvement and stay up to date with the latest security threats and countermeasures.

**🚨 Incident Response**\
In the unlikely event of a security breach, we have a comprehensive incident response plan in place. We will notify affected customers promptly and take all necessary steps to contain and resolve the issue.


# GDPR

## GDPR

### GDPR Privacy

#### Legal Basis for Processing Personal Data under GDPR

We may process Personal Data under the following conditions:

* **Consent:** You have given Your consent for processing Personal Data for one or more specific purposes.
* **Performance of a contract:** Provision of Personal Data is necessary for the performance of an agreement with You and/or for any pre-contractual obligations thereof.
* **Legal obligations:** Processing Personal Data is necessary for compliance with a legal obligation to which the Company is subject.
* **Vital interests:** Processing Personal Data is necessary in order to protect Your vital interests or of another natural person.
* **Public interests:** Processing Personal Data is related to a task that is carried out in the public interest or in the exercise of official authority vested in the Company.
* **Legitimate interests:** Processing Personal Data is necessary for the purposes of the legitimate interests pursued by the Company.

In any case, the Company will gladly help to clarify the specific legal basis that applies to the processing, and in particular whether the provision of Personal Data is a statutory or contractual requirement, or a requirement necessary to enter into a contract.

#### Your Rights under the GDPR

The Company undertakes to respect the confidentiality of Your Personal Data and to guarantee You can exercise Your rights.

You have the right under this Privacy Policy, and by law if You are within the EU, to:

* **Request access to Your Personal Data.** The right to access, update or delete the information We have on You. Whenever made possible, you can access, update or request deletion of Your Personal Data directly within Your account settings section. If you are unable to perform these actions yourself, please contact Us to assist You. This also enables You to receive a copy of the Personal Data We hold about You.
* **Request correction of the Personal Data that We hold about You.** You have the right to have any incomplete or inaccurate information We hold about You corrected.
* **Object to processing of Your Personal Data.** This right exists where We are relying on a legitimate interest as the legal basis for Our processing and there is something about Your particular situation, which makes You want to object to our processing of Your Personal Data on this ground. You also have the right to object where We are processing Your Personal Data for direct marketing purposes.
* **Request erasure of Your Personal Data.** You have the right to ask Us to delete or remove Personal Data when there is no good reason for Us to continue processing it.
* **Request the transfer of Your Personal Data.** We will provide to You, or to a third-party You have chosen, Your Personal Data in a structured, commonly used, machine-readable format. Please note that this right only applies to automated information which You initially provided consent for Us to use or where We used the information to perform a contract with You.
* **Withdraw Your consent.** You have the right to withdraw Your consent on using your Personal Data. If You withdraw Your consent, We may not be able to provide You with access to certain specific functionalities of the Service.

#### Exercising of Your GDPR Data Protection Rights

You may exercise Your rights of access, rectification, cancellation and opposition by contacting Us. Please note that we may ask You to verify Your identity before responding to such requests. If You make a request, We will try our best to respond to You as soon as possible.

You have the right to complain to a Data Protection Authority about Our collection and use of Your Personal Data. For more information, if You are in the European Economic Area (EEA), please contact Your local data protection authority in the EEA.

**Terms of Service**

Please refer to our Terms of Service to learn more about our responsibilities toward our users and their data. We are committed to being transparent about our practices.

**Privacy Policy**

Our Privacy Policy clearly outlines how we collect, use, process, and share personal information. It also explains how you can exercise your rights regarding the personal data you share with us. We respect your choice to receive or opt out of communications with us. For more details, please see our Privacy Policy.

If you are a current user, you can request to review, edit, or delete your personal information by submitting a support ticket.

**Data Processing Agreement**

You can read the Data Processing Agreement here.


# Terms & Conditions

## Terms of Service

**Effective Date:** June 27, 2025

These Terms of Service ("Terms") govern your access to and use of the Agent Supply website ("Site"), our software-as-a-service (SaaS) platform, AI agents, applications, and related services (collectively, the "Services"). Please read them carefully.

By accessing or using our Services, you agree to be bound by these Terms. If you are using the Services on behalf of an organization, you represent that you have the authority to bind that organization.

### 1. Eligibility

To use Agent Supply, you must be at least 18 years old and have the legal capacity to enter into a binding agreement. By using our Services, you confirm that you meet these requirements.

### 2. Account Registration

To access certain features, you may be required to register for an account. You agree to:

* Provide accurate and complete information
* Keep your account credentials secure
* Notify us immediately of any unauthorized use
* Be responsible for all activity under your account

### 3. Use of Services

You may use the Services only in compliance with these Terms and all applicable laws. You agree not to:

* Copy, modify, or distribute any part of the Services
* Reverse engineer or attempt to extract the source code
* Use the Services for any unlawful, harmful, or fraudulent purpose
* Use our AI agents to disseminate offensive, misleading, or prohibited content

### 4. Subscription and Billing

Agent Supply offers both free and paid subscription plans. By selecting a paid plan, you agree to:

* Pay the applicable subscription fees
* Provide accurate billing information
* Authorize us to charge your payment method

Fees are non-refundable unless required by law. Subscriptions renew automatically unless canceled.

### 5. Intellectual Property

All content, trademarks, service marks, software, and intellectual property provided by Agent Supply remain the property of Agent Supply or its licensors. You are granted a limited, non-exclusive, non-transferable license to use the Services under these Terms.

### 6. User Content

You retain ownership of the content you submit or upload ("User Content"). By using our Services, you grant us a worldwide, non-exclusive license to use, reproduce, and display your User Content solely to operate and improve the Services.

You represent and warrant that:

* You own or have the necessary rights to the User Content
* Your content does not violate any third-party rights or laws

### 7. Third-Party Integrations

Agent Supply may offer integrations with third-party platforms and services. We are not responsible for the functionality or content of these third parties, and your use of them is governed by their own terms.

### 8. Termination

We may suspend or terminate your account and access to the Services at any time, with or without cause or notice. You may also cancel your subscription and discontinue use at any time.

Upon termination, all rights granted to you will cease and any outstanding fees will become immediately due.

### 9. Disclaimers

The Services are provided "as is" and "as available." We disclaim all warranties, express or implied, including merchantability, fitness for a particular purpose, and non-infringement. We do not guarantee that the Services will be uninterrupted or error-free.

### 10. Limitation of Liability

To the maximum extent permitted by law, Agent Supply shall not be liable for any indirect, incidental, special, consequential, or punitive damages, including loss of profits, data, or use, arising out of or in connection with your use of the Services.

Our total liability for any claim arising out of these Terms or the Services shall not exceed the amount you paid to us in the 12 months prior to the claim.

### 11. Indemnification

You agree to indemnify and hold harmless Agent Supply, its affiliates, officers, employees, and agents from any claim, liability, loss, or expense, including attorneys' fees, arising from your use of the Services or violation of these Terms.

### 12. Changes to Terms

We may modify these Terms at any time. We will notify you of material changes via the Site or email. Your continued use of the Services after changes become effective constitutes acceptance.

### 13. Governing Law

These Terms are governed by the laws of Delaware, USA, without regard to its conflict of law principles. Any disputes shall be resolved in the courts located in United States of America.

### 14. Contact Us

If you have any questions about these Terms, please contact us at:

<hello@agentsupply.ai>

Agent Supply, LLC

All rights reserved.


# Privacy Policy

## Privacy Policy for Agent Supply

**Last Updated:** June 27, 2025

Agent Supply ("we", "us", or "our") is committed to protecting the privacy and security of our users' information. This Privacy Policy explains how we collect, use, disclose, and safeguard your information when you visit our website [https://agentsupply.ai](https://agentsupply.ai/) (the "Site") or use our platform and services (the "Services"). Please read this Privacy Policy carefully.

### 1. Information We Collect

We collect several types of information to provide and improve our Services:

#### a. Personal Information

* Full name
* Email address
* Company name
* Phone number
* Billing address
* Payment information (processed securely via third-party payment processors)

#### b. Account and Authentication Information

* Login credentials (email and password)
* API keys and access tokens (for platform integrations)

#### c. Business and Usage Information

* User preferences and configurations
* Company profile and agent usage data
* Feedback and communication history

#### d. Device and Technical Information

* IP address
* Browser type and version
* Device type and operating system
* Date and time of access
* Pages visited and session duration
* Referral URLs

#### e. Cookies and Tracking Technologies

* Session cookies
* Persistent cookies
* Analytics cookies (e.g., Google Analytics, Hotjar)
* Marketing and retargeting pixels (e.g., Meta, LinkedIn)

### 2. How We Use Your Information

We use the information we collect to:

* Provide, operate, and maintain the Services
* Improve, personalize, and expand the functionality of the Site and platform
* Communicate with you (support, billing, updates)
* Send marketing, promotional, and onboarding emails
* Analyze user behavior and usage trends
* Detect and prevent fraud, abuse, or technical issues
* Comply with legal obligations and enforce our terms of service

### 3. Sharing Your Information

We do not sell your personal information. We may share your data with:

* **Service providers:** Hosting, analytics, email, and payment processors
* **Third-party integrations:** If you choose to connect third-party tools (e.g., CRMs, Zapier)
* **Business transfers:** In the case of a merger, acquisition, or asset sale
* **Legal and regulatory authorities:** When required by law or to protect our rights

All third parties are required to comply with data protection regulations and only use your data for specified purposes.

### 4. Data Retention

We retain your personal information only as long as necessary:

* To provide the Services
* To comply with legal and tax requirements
* To enforce our agreements

Upon termination of your account, we may retain anonymized or aggregated data for analytical purposes.

### 5. Security

We implement appropriate technical and organizational security measures to protect your data:

* Data encryption (in transit and at rest)
* Secure user authentication
* Regular vulnerability assessments
* Access controls and monitoring

However, no system is 100% secure, and we cannot guarantee absolute security.

### 6. Your Rights and Choices

Depending on your location, you may have rights under applicable data protection laws:

* Access your data
* Rectify inaccurate information
* Erase your data (right to be forgotten)
* Restrict or object to processing
* Port your data
* Withdraw consent (where applicable)

To exercise your rights, contact us at <hello@agentsupply.ai>.

### 7. International Transfers

Our Services are operated from the United Arab Emirates (UAE), but we may transfer data internationally for processing. We ensure appropriate safeguards are in place for cross-border data transfers.

### 8. Third-Party Links

Our Site may contain links to third-party websites or services. We are not responsible for their content, privacy practices, or data security.

### 9. Children's Privacy

Our Services are not directed to individuals under the age of 18. We do not knowingly collect data from children. If you believe we have unintentionally collected such data, contact us immediately.

### 10. Changes to This Privacy Policy

We may update this Privacy Policy from time to time. Changes will be posted on this page with an updated "Last Updated" date. We encourage you to review it periodically.

### 11. Contact Us

For any questions or concerns regarding this Privacy Policy or your personal data, please contact us:

Agent Supply

Email: <hello@agentsupply.ai>

Website: [https://agentsupply.ai](https://agentsupply.ai/)


# Data Processing Agreement

#### Use of Your Personal Data

Stammer.ai (The Company) may use Personal Data for the following purposes:

* **To provide and maintain our Service**, including to monitor the usage of our Service.
* **To manage Your Account:** to manage Your registration as a user of the Service. The Personal Data You provide can give You access to different functionalities of the Service that are available to You as a registered user.
* **For the performance of a contract:** the development, compliance and undertaking of the purchase contract for the products, items or services You have purchased or of any other contract with Us through the Service.
* **To contact You:** To contact You by email, telephone calls, SMS, or other equivalent forms of electronic communication, such as a mobile application's push notifications regarding updates or informative communications related to the functionalities, products or contracted services, including the security updates, when necessary or reasonable for their implementation.
* **To provide You** with news, special offers and general information about other goods, services and events which we offer that are similar to those that you have already purchased or enquired about unless You have opted not to receive such information.
* **To manage Your requests:** To attend and manage Your requests to Us.
* **To deliver targeted advertising to You**: We may use Your information to develop and display content and advertising (and work with third-party vendors who do so) tailored to Your interests and/or location and to measure its effectiveness.
* **For business transfers:** We may use Your information to evaluate or conduct a merger, divestiture, restructuring, reorganization, dissolution, or other sale or transfer of some or all of Our assets, whether as a going concern or as part of bankruptcy, liquidation, or similar proceeding, in which Personal Data held by Us about our Service users is among the assets transferred.
* **For other purposes**: We may use Your information for other purposes, such as data analysis, identifying usage trends, determining the effectiveness of our promotional campaigns and to evaluate and improve our Service, products, services, marketing and your experience.

We may share Your personal information in the following situations:

* **With Service Providers:** We may share Your personal information with Service Providers to monitor and analyze the use of our Service, to show advertisements to You to help support and maintain Our Service, to advertise on third party websites to You after You visited our Service, for payment processing, to contact You.
* **For business transfers:** We may share or transfer Your personal information in connection with, or during negotiations of, any merger, sale of Company assets, financing, or acquisition of all or a portion of Our business to another company.
* **With Affiliates:** We may share Your information with Our affiliates, in which case we will require those affiliates to honor this Privacy Policy. Affiliates include Our parent company and any other subsidiaries, joint venture partners or other companies that We control or that are under common control with Us.
* **With business partners:** We may share Your information with Our business partners to offer You certain products, services or promotions.
* **With other users:** when You share personal information or otherwise interact in the public areas with other users, such information may be viewed by all users and may be publicly distributed outside. If You interact with other users or register through a Third-Party Social Media Service, Your contacts on the Third-Party Social Media Service may see Your name, profile, pictures and description of Your activity. Similarly, other users will be able to view descriptions of Your activity, communicate with You and view Your profile.
* **With Your consent**: We may disclose Your personal information for any other purpose with Your consent.

#### Retention of Your Personal Data

The Company will retain Your Personal Data only for as long as is necessary for the purposes set out in this Privacy Policy. We will retain and use Your Personal Data to the extent necessary to comply with our legal obligations (for example, if we are required to retain your data to comply with applicable laws), resolve disputes, and enforce our legal agreements and policies.

The Company will also retain Usage Data for internal analysis purposes. Usage Data is generally retained for a shorter period of time, except when this data is used to strengthen the security or to improve the functionality of Our Service, or We are legally obligated to retain this data for longer time periods.

#### Transfer of Your Personal Data

Your information, including Personal Data, is processed at the Company's operating offices and in any other places where the parties involved in the processing are located. It means that this information may be transferred to — and maintained on — computers located outside of Your state, province, country or other governmental jurisdiction where the data protection laws may differ than those from Your jurisdiction.

Your consent to this Privacy Policy followed by Your submission of such information represents Your agreement to that transfer.

The Company will take all steps reasonably necessary to ensure that Your data is treated securely and in accordance with this Privacy Policy and no transfer of Your Personal Data will take place to an organization or a country unless there are adequate controls in place including the security of Your data and other personal information.

#### Delete Your Personal Data

You have the right to delete or request that We assist in deleting the Personal Data that We have collected about You.

Our Service may give You the ability to delete certain information about You from within the Service.

You may update, amend, or delete Your information at any time by signing in to Your Account, if you have one, and visiting the account settings section that allows you to manage Your personal information. You may also contact Us to request access to, correct, or delete any personal information that You have provided to Us.

Please note, however, that We may need to retain certain information when we have a legal obligation or lawful basis to do so.

#### Disclosure of Your Personal Data

**Business Transactions**

If the Company is involved in a merger, acquisition or asset sale, Your Personal Data may be transferred. We will provide notice before Your Personal Data is transferred and becomes subject to a different Privacy Policy.

**Law enforcement**

Under certain circumstances, the Company may be required to disclose Your Personal Data if required to do so by law or in response to valid requests by public authorities (e.g. a court or a government agency).

**Other legal requirements**

The Company may disclose Your Personal Data in the good faith belief that such action is necessary to:

* Comply with a legal obligation
* Protect and defend the rights or property of the Company
* Prevent or investigate possible wrongdoing in connection with the Service
* Protect the personal safety of Users of the Service or the public
* Protect against legal liability

#### Security of Your Personal Data

The security of Your Personal Data is important to Us, but remember that no method of transmission over the Internet, or method of electronic storage is 100% secure. While We strive to use commercially acceptable means to protect Your Personal Data, We cannot guarantee its absolute security.

### Detailed Information on the Processing of Your Personal Data

The Service Providers We use may have access to Your Personal Data. These third-party vendors collect, store, use, process and transfer information about Your activity on Our Service in accordance with their Privacy Policies.

#### Analytics

We may use third-party Service providers to monitor and analyze the use of our Service.

* **Google Analytics**

  Google Analytics is a web analytics service offered by Google that tracks and reports website traffic. Google uses the data collected to track and monitor the use of our Service. This data is shared with other Google services. Google may use the collected data to contextualize and personalize the ads of its own advertising network.

  You can opt-out of having made your activity on the Service available to Google Analytics by installing the Google Analytics opt-out browser add-on. The add-on prevents the Google Analytics JavaScript (ga.js, analytics.js and dc.js) from sharing information with Google Analytics about visits activity.

  You may opt-out of certain Google Analytics features through your mobile device settings, such as your device advertising settings or by following the instructions provided by Google in their Privacy Policy: <https://policies.google.com/privacy>

  For more information on the privacy practices of Google, please visit the Google Privacy & Terms web page: <https://policies.google.com/privacy>
* **Matomo**

  Matomo is a web analytics service. You can visit their Privacy Policy page here: <https://matomo.org/privacy-policy>

#### Advertising

We may use Service Providers to show advertisements to You to help support and maintain Our Service.

* **Google AdSense & DoubleClick Cookie**

  Google, as a third party vendor, uses cookies to serve ads on our Service. Google's use of the DoubleClick cookie enables it and its partners to serve ads to our users based on their visit to our Service or other websites on the Internet.

  You may opt out of the use of the DoubleClick Cookie for interest-based advertising by visiting the Google Ads Settings web page: <http://www.google.com/ads/preferences/>
* **Meta**

  Their Privacy Policy can be viewed at <https://www.facebook.com/privacy/policy/>

#### Email Marketing

We may use Your Personal Data to contact You with newsletters, marketing or promotional materials and other information that may be of interest to You. You may opt-out of receiving any, or all, of these communications from Us by following the unsubscribe link or instructions provided in any email We send or by contacting Us.

We may use Email Marketing Service Providers to manage and send emails to You.

* **SiteRight**

  Their Privacy Policy can be viewed at <https://www.siteright.co/privacy-policy>
* **Amazon AWS**

  Their Privacy Policy can be viewed at <https://aws.amazon.com/privacy/>

#### Payments

We may provide paid products and/or services within the Service. In that case, we may use third-party services for payment processing (e.g. payment processors).

We will not store or collect Your payment card details. That information is provided directly to Our third-party payment processors whose use of Your personal information is governed by their Privacy Policy. These payment processors adhere to the standards set by PCI-DSS as managed by the PCI Security Standards Council, which is a joint effort of brands like Visa, Mastercard, American Express and Discover. PCI-DSS requirements help ensure the secure handling of payment information.

* **Stripe**

  Their Privacy Policy can be viewed at <https://stripe.com/us/privacy>
* **PayPal**

  Their Privacy Policy can be viewed at <https://www.paypal.com/webapps/mpp/ua/privacy-full>

#### Behavioral Remarketing

The Company uses remarketing services to advertise to You after You accessed or visited our Service. We and Our third-party vendors use cookies and non-cookie technologies to help Us recognize Your Device and understand how You use our Service so that We can improve our Service to reflect Your interests and serve You advertisements that are likely to be of more interest to You.

These third-party vendors collect, store, use, process and transfer information about Your activity on Our Service in accordance with their Privacy Policies and to enable Us to:

* Measure and analyze traffic and browsing activity on Our Service
* Show advertisements for our products and/or services to You on third-party websites or apps
* Measure and analyze the performance of Our advertising campaigns

Some of these third-party vendors may use non-cookie technologies that may not be impacted by browser settings that block cookies. Your browser may not permit You to block such technologies. You can use the following third-party tools to decline the collection and use of information for the purpose of serving You interest-based advertising:

* The NAI's opt-out platform: <http://www.networkadvertising.org/choices/>
* The EDAA's opt-out platform <http://www.youronlinechoices.com/>
* The DAA's opt-out platform: <http://optout.aboutads.info/?c=2&lang=EN>

You may opt-out of all personalized advertising by enabling privacy features on Your mobile device such as Limit Ad Tracking (iOS) and Opt Out of Ads Personalization (Android). See Your mobile device Help system for more information.

We may share information, such as hashed email addresses (if available) or other online identifiers collected on Our Service with these third-party vendors. This allows Our third-party vendors to recognize and deliver You ads across devices and browsers. To read more about the technologies used by these third-party vendors and their cross-device capabilities please refer to the Privacy Policy of each vendor listed below.

The third-party vendors We use are:

* **Google Ads (AdWords)**

  Google Ads (AdWords) remarketing service is provided by Google Inc.

  You can opt-out of Google Analytics for Display Advertising and customize the Google Display Network ads by visiting the Google Ads Settings page: <http://www.google.com/settings/ads>

  Google also recommends installing the Google Analytics Opt-out Browser Add-on - <https://tools.google.com/dlpage/gaoptout> - for your web browser. Google Analytics Opt-out Browser Add-on provides visitors with the ability to prevent their data from being collected and used by Google Analytics.

  For more information on the privacy practices of Google, please visit the Google Privacy & Terms web page: <https://policies.google.com/privacy>
* **Twitter**

  Twitter remarketing service is provided by Twitter Inc.

  You can opt-out from Twitter's interest-based ads by following their instructions: <https://support.twitter.com/articles/20170405>

  You can learn more about the privacy practices and policies of Twitter by visiting their Privacy Policy page: <https://twitter.com/privacy>
* **Facebook**

  Facebook remarketing service is provided by Facebook Inc.

  You can learn more about interest-based advertising from Facebook by visiting this page: <https://www.facebook.com/help/516147308587266>

  To opt-out from Facebook's interest-based ads, follow these instructions from Facebook: <https://www.facebook.com/help/568137493302217>

  Facebook adheres to the Self-Regulatory Principles for Online Behavioural Advertising established by the Digital Advertising Alliance. You can also opt-out from Facebook and other participating companies through the Digital Advertising Alliance in the USA <http://www.aboutads.info/choices/>, the Digital Advertising Alliance of Canada in Canada <http://youradchoices.ca/> or the European Interactive Digital Advertising Alliance in Europe <http://www.youronlinechoices.eu/>, or opt-out using your mobile device settings.

  For more information on the privacy practices of Facebook, please visit Facebook's Data Policy: <https://www.facebook.com/privacy/explanation>

#### Usage, Performance and Miscellaneous

We may use third-party Service Providers to maintain and improve our Service.

* **Invisible reCAPTCHA**

  We use an invisible captcha service named reCAPTCHA. reCAPTCHA is operated by Google.

  The reCAPTCHA service may collect information from You and from Your Device for security purposes.

  The information gathered by reCAPTCHA is held in accordance with the Privacy Policy of Google: <https://www.google.com/intl/en/policies/privacy/>


# AI Model Data Usage

## AI Model Data Usage

All of your conversations on the Agent Supply system are strictly confidential and never used for training purposes.

Here is an overview of the data privacy and model training policy of OpenAI:

### OpenAI <a href="#id-048a1afa33514188842a8b40caaec86b" id="id-048a1afa33514188842a8b40caaec86b"></a>

* OpenAI ensures that data submitted through its API is not used to train its models.
* OpenAI retains API inputs and outputs for up to 30 days to identify abuse and provide the service. After this period, data is deleted unless legally required to retain it longer.
* Data may be reviewed by authorized employees for abuse monitoring and legal compliance, but it is not used for model training.

For more details, visit the [OpenAI Privacy Policy.](https://openai.com/enterprise-privacy/)


# Service Level Agreement

**Effective: July 26, 2024**

Stammer.ai uses commercially reasonable efforts to make the online Stammer.ai Services available 24 hours a day, 7 days a week, except for: (i) planned downtime (of which Stammer.ai shall give advance electronic notice), and (ii) any unavailability caused by circumstances beyond Stammer.ai’s reasonable control, including, for example, an act of God, act of government, flood, fire, earthquake, civil unrest, act of terror, strike or other labor problem (other than one involving Stammer.ai employees), Internet service provider failure or delay, Non-Stammer.ai Application, or denial of service attack. For information on Stammer.ai’s current status, see your [Agency's Dashboard](https://app.stammer.ai/).


# Resources

[Sales Deck](https://docs.stammer.ai/stammer.ai-docs/support/resources/sales-deck)[💰AI Agency 101](https://docs.stammer.ai/stammer.ai-docs/support/resources/ai-agency-101)[<br>](https://docs.stammer.ai/stammer.ai-docs/support/changelog-roadmap)


# Sales Deck

White label this slide deck with your own name and logo as a resource to help you sell better.

{% embed url="<https://www.canva.com/design/DAF_gzisGSg/1I1XKgUovp2hG6ql8uu2kA/view>" %}


# AI Agency 101

[How to Price Your AI Chatbots](https://docs.stammer.ai/stammer.ai-docs/support/resources/ai-agency-101/how-to-price-your-ai-chatbots)[How to Get More Clients](https://docs.stammer.ai/stammer.ai-docs/support/resources/ai-agency-101/how-to-get-more-clients)[The Value Proposition of AI Agents](https://docs.stammer.ai/stammer.ai-docs/support/resources/ai-agency-101/the-value-proposition-of-ai-agents)[AI SaaS Funnel Explained](https://docs.stammer.ai/stammer.ai-docs/support/resources/ai-agency-101/ai-saas-funnel-explained)


# How to Price Your AI Chatbots

## How to Price Your AI Chatbots

{% embed url="<https://youtu.be/IGgg397XB90>" %}

Examples of pricing plans

<figure><img src="https://1359281993-files.gitbook.io/~/files/v0/b/gitbook-x-prod.appspot.com/o/spaces%2FkLIQnOFYHkQtdWxUzzFE%2Fuploads%2Fl7pq6SNlY1Id2IiDKgXF%2FScreenshot%202024-09-05%20at%2012.33.29%E2%80%AFPM.jpg?alt=media&#x26;token=ba999737-30bf-4256-8966-48030c90d953" alt=""><figcaption></figcaption></figure>


# How to Get More Clients

## How to Get More Clients

{% embed url="<https://youtu.be/s1C-cu9fT1o>" %}


# The Value Proposition of AI Agents

{% embed url="<https://youtu.be/vdWL_GQStag>" %}


# AI SaaS Funnel Explained

## AI SaaS Funnel Explained

{% embed url="<https://youtu.be/q6b_Ovvp-EU>" %}